Showing posts with label dessert. Show all posts

Tuesday, June 19, 2012

Candy Graduation Caps

My sister graduated from high school the other day! But this recipe can be used for any type of graduation. High school, college, preschool, what have you. Our high school colors were blue and silver (they were navy blue and cyan when I was a freshman, though, so I like to say that our colors are blue and blue), but this can be done with any school color. In a few years, I see myself making this with purple (the color for University of Portland).
Making these candies is a lot simpler than it looks. It does, however, require two shopping trips: one trip to any craft supplies store, and one to your regular grocery store.

Ingredients:
12 chilled but not frozen Reese's Cups
12 chocolate squares
12 M&M's of your school's color
1 colored licorice rope of your school's color
12 candy sticks (the kind used for lollipops)
Candy Melts (chocolate is probably the best idea. I used Vanilla, but mistakes show very easily with this one).

Recipe:
First, cut the colored licorice into about two inch sections. Then, either pull the licorice apart or cut it apart so that you have a thin two inch rope, which will look like a tassel.
Next, melt the candy melts. Follow the instructions on the package, but generally this is done by melting in the microwave, on defrost or half power. You won't need the whole package. Just a handful should do. If the candy melts harden while you're working, just microwave it again. That's the best part. You can always go back and reuse. It's not really that time sensitive.
While you melt the candy melts, unwrap your chocolates and Reese's cups.
Once you've done that, take one candy stick and dip the end into the melted candy melts. Take this end and insert it into an upside down Reese's cup.
After the candy melt has hardened so that the sticks are firm in the cups, coat the top of your Reese's cup with melted candy melts and place a chocolate square on top. Let this harden, too, so that it looks like a graduation cap and is firm in its shape.
Next, stick the "tassel" (licorice rope) on the top using melted candy melts as glue. I used the tip of a sharp knife as my paint brush. Be sure to make the line as thin as possible (or even better, paint half of the licorice rope and then place it firmly on the top of the cap.
Then, paint the "M" half of the M&M with melted candy melts. Place this in the center of the top of your cap.
And now you're done. You have candy graduation caps that, once the candy melts have hardened, will stay together and be enjoyed by all your graduation party guests. Do be sure to clean up your mess as quickly as possible. If your candy melts have hardened in your mug, melt them again before you clean, which will make it significantly easier to clean.


These candies were a hit at my sister's graduation party. They'll be a hit at yours too. They're a lot more personal than candies you might find at the grocery store, but a lot easier than other graduation-themed treats that you might make for your party. I found a similar candy on Pinterest but it didn't come with a recipe. So, I used ideas from this How To. There are several different ways to make this candy, but this is, by far, the easiest. And it can be done in a dorm kitchen. All you need is a mug and a microwave, as well as all the ingredients.
Happy graduation to all the graduates out there!


Tuesday, February 21, 2012

Mardi Gras!

Today is Mardi Gras or Fat Tuesday. Tomorrow is Ash Wednesday, which marks the beginning of Lent. I'm at a Catholic school now, so I wonder what all of this will mean. I guess tomorrow I will find out. Most likely, it'll mean absolutely nothing to me personally, since I do not participate in Lent. But, I'm curious to see if there are any noticeable changes, especially in the cafeteria.
Anyway, back to Mardi Gras. It's a pretty big deal, especially in the Cajun culture of Louisiana. You probably already know all of this...and I am probably boring you. I apologize. Anyway, to celebrate, the cafeteria was serving Cajun food. Feeling adventurous, I gave it a try. I ordered Bourbon Saute, which was supposed to be prawns and crawfish over dirty rice, but ended up being sans prawns (which was saddening because I love prawns). For dessert, I got a bignet, fried dough covered in powdered sugar, similar in taste to an old fashion doughnut. The entire meal turned into a round of Bad News, Good News.

Bad News: The dumb cafeteria worker put my bignet on top of the crawfish. Nothing tastier than a fishy dessert...or crawfish covered in powdered sugar.


Good News: I got it to turn out looking pretty ok anyway. Thank goodness I have plates.


Bad News: It turns out I don't like crawfish.Or bourbon. Or dirty rice. Which is a shame, because I like other Cajun food. And, when I edit the picture enough, it actually looks delicious.
Also, it was very, very, very messy (partially because the cafeteria worker just dumped rice all over everything). I can't complain too much about the cafeteria worker, though, because I had a class with him last semester and he seems like a pretty nice guy.


Good News: I still like bignets. What am I saying. I love bignets. Some year I will learn to make them myself. And I will be just like Tiana in Princess and the Frog. Boy, I cannot wait for that day. Until then, I must say, this was delicious. Even with the awful taste from the crawfish stuck in my mouth, and the crawfish juices and dirty rice stuck to the bottom, this was SUPER TASTY. 


There is good and bad in everything, I guess, even Mardi Gras.
Oh, and no, I do not have any beads. This is a Catholic university. Come on, guys. We don't party. We study. Or at least, that's what I do...


Dorm Food

 Subscribe in a reader

Wednesday, February 8, 2012

Knock You Naked Brownies

I didn't name these. Or invent them. Or do very much in making them. But I did eat one (but no, I did not get naked for these).
Seriously, though....my friends were making brownies Friday afternoon, and I thought I would join them because, well, brownies. And also friends. And, most importantly, one of them happens to be a really great baker...like an AMAZING baker. She was the one who found the recipe by The Pioneer Woman.
The recipe was altered, slightly, but tasted delicious anyway.

Ingredients:
Chocolate Cake Mix
Evaporated milk (2/3 cup and 1/2 cup)
1/2 cup of melted butter
30 Riesen caramels (unwrapped)

Recipe:
First, preheat the oven to 350 degrees.
Then, mix together cake mix, 1/3 cup evaporated milk, and melted butter. Stir, stir, stir!
Divide the mixture in half and press half of it into a square baking pan (make sure to grease it pretty well). Be sure to make edges with the dough, so that when you add the caramel, it won't leak.
Next, bake it for about 8 to 10 minutes.
Then, melt the Riesen caramels with 1/2 cup evaporated milk (you're supposed t do this in a double boiler, but it worked just melting it in a pot over the stove). Stir constantly, in effort to avoid burning any of it.
Next, pour this sauce over the cooked brownie in the baking pan.
Then, take the second (unbaked) half of the brownie dough and shape it into a large square about the size of (or a little smaller than) the pan. Then, find a way to get this on top of the caramel and brownie in the pan, without causing the hot caramel to splash. Good luck!
Now, bake for 20 to 25 minutes. Allow it to cool to room temperature. Then cut it, cover it and refrigerate for several hours.
Then, finally, you're done. You have some delicious brownies. Like, seriously, amazing brownies. SOOOOO good. You'd be crazy not to try these.

What else would you be crazy not to try that my dear friend Sarah has shown me? Inbox Dollars. It's great for anyone who checks their e-mail everyday...like me. I just got an account and I totally recommend you to do the same. In fact, just for making an account, you'll get $5! (And for every dollar that you make, they will send me an additional 10 cents...just a little perk that I'll be getting from this). Check it out, if you want. If not, I won't be offended. But do try the brownies...that's a necessity.

Dorm Food

 Subscribe in a reader

Sunday, December 25, 2011

Cute Christmas Cookies

One post with two recipes? Yup, that's what this is. It's Christmas time, which means time for lots and lots and lots of cookies. Last year I made over 500 cookies in just the week of Christmas. This year I didn't make quite that many, but I still made plenty enough to share with you.


Cookie Number One: Sugar Cookies
The first recipe is for sugar cookies. I borrowed this recipe from Our Best Bites, and man they were delicious. My mom and I attempted to make icing but somehow ruined it, so the cookies remained plain and undecorated but even so the sugar cookies tasted quite delicious. I'm so grateful to have found this wonderful recipe. I shall never use another sugar cookie recipe again...especially since it only had an hour of chilling time, compared to the couple hours needed for my other standby recipe.

Ingredients:
1 cup of real butter (2 sticks)
1 cup of sugar
1 egg
1 1/2 teaspoons of vanilla extract (or almond, though I used all of my almond up making macaroons the other day)
3 cups of flour
1 1/2 teaspoons of baking powder
1/2 teaspoon of salt

First cream the softened butter and sugar together for about 2 minutes, using an electric mixer.
Next, add the egg and extract and mix thoroughly.
In a separate bowl, mix the flour, baking powder, and salt together.
Slowly add the flour mixture to the butter mixture and mix thoroughly. It will end up tasting so delicious...but unless you're doubling the recipe, try your best to avoid eating all the dough.
Now, cover the bowl with press and seal wrap or similar plastic covering. Then place it in the fridge to chill for an hour. (There's another trick for this step, but I didn't get a chance to try it that way).
When it's chilled, take the dough out of the fridge. If the dough is too crumbly, you probably measured something incorrectly but you can fix it by adding a bit of water. Don't add too much, though.
Now, roll it on a floured surface (using a rolling pin that has also been floured). Make shapes using cookie cutters and place them on greased cookie sheets.
Finally, bake for about 8 minutes at 350 degrees.


These ended up tasting so delicious. I will save this recipe and use it every time I need to make cookies. mmmmmm

Cookie Number 2: Peanut Butter Cookies
The second type of cookie is peanut butter cookies. I saw the design idea on Pinterest (which is a wonderful site if you haven't already visited it). I must be honest, I cheated. I used a pre-made package by Betty Crocker. But, for these cookies the point was to make them very cute. Which, if I do say so myself, I did manage to do.
To make these cookies, I first followed the instructions on the package. Before baking, I flattened them using a fork to make a crisscross pattern, then used my washed fingers to smooth the surface.
When they came out of the oven, I decorated them with cold candies. Half of them were thumbprint cookies using chocolate kisses.
The other half were reindeer cookies. Chocolate covered pretzels made perfect antlers, and M&Ms made the eyes and noses. They have to be refrigerated or frozen first to keep them from melting. This part is very important so don't forget...melted chocolate makes a terrible mess, so don't let it happen to you. You may, also, want to put the cookies in the fridge after you decorate them, in effort to help the candies set in the cookies.


These cookies ended up so adorable. I got several compliments for them. And they were super easy to make, to boot. These could easily be made in a dorm, assuming you have an oven. They're so cute and easy, I can't believe I haven't done it before.


Dorm Food

 Subscribe in a reader

Friday, December 23, 2011

Coconut Macaroons at Home

A lot of people from school were excited to get home to a kitchen. But me? I live in a dorm full of kitchens (8, to be exact). I have an oven at school. So, what I was really excited for was the plethera of ingredients that I don't have to pay for, as well as an electric mixer. And what is a girl to do with such items? Why, make her favorite fancy cookie, of course: home made macaroons.
These are not cookies that can be easily done in any dorm room. But, they are delicious and super fun to make, so I hope you will accept this recipe anyway. This recipe is adapted the Joy of Cooking cook book (a book that is so worn, it no longer has a cover, or a spine, and is split in half because the glue is coming undone).
Ingredients:
2 egg whites
6 cups of moist shredded coconut
1/4 teaspoon of salt
1 1/2 teaspoons of almond extract
1/2 teaspoon of vanilla extract
2/3 cup of sweetened condensed milk
First, separate the whites from the yokes of two eggs. This is tons of fun for anyone who hasn't done it before. There are two ways to doing it, but personally I prefer to use the shells to separate the whites. simply pass the yoke back and forth between the two halves of the shell after you crack the egg, trying to get it to the point that all of the egg whites are below you in a bowl, and the egg yokes are in the shell. This way works if you have mastered the art of cracking eggs. If you haven't, you can use your fingers and simply pass the yoke back and forth between your hands so that your hand has the yoke and the bowl has all of the whites. This way is a lot more difficult to do. Help With Cooking has wonderful directions on how to separate egg whites and yokes.


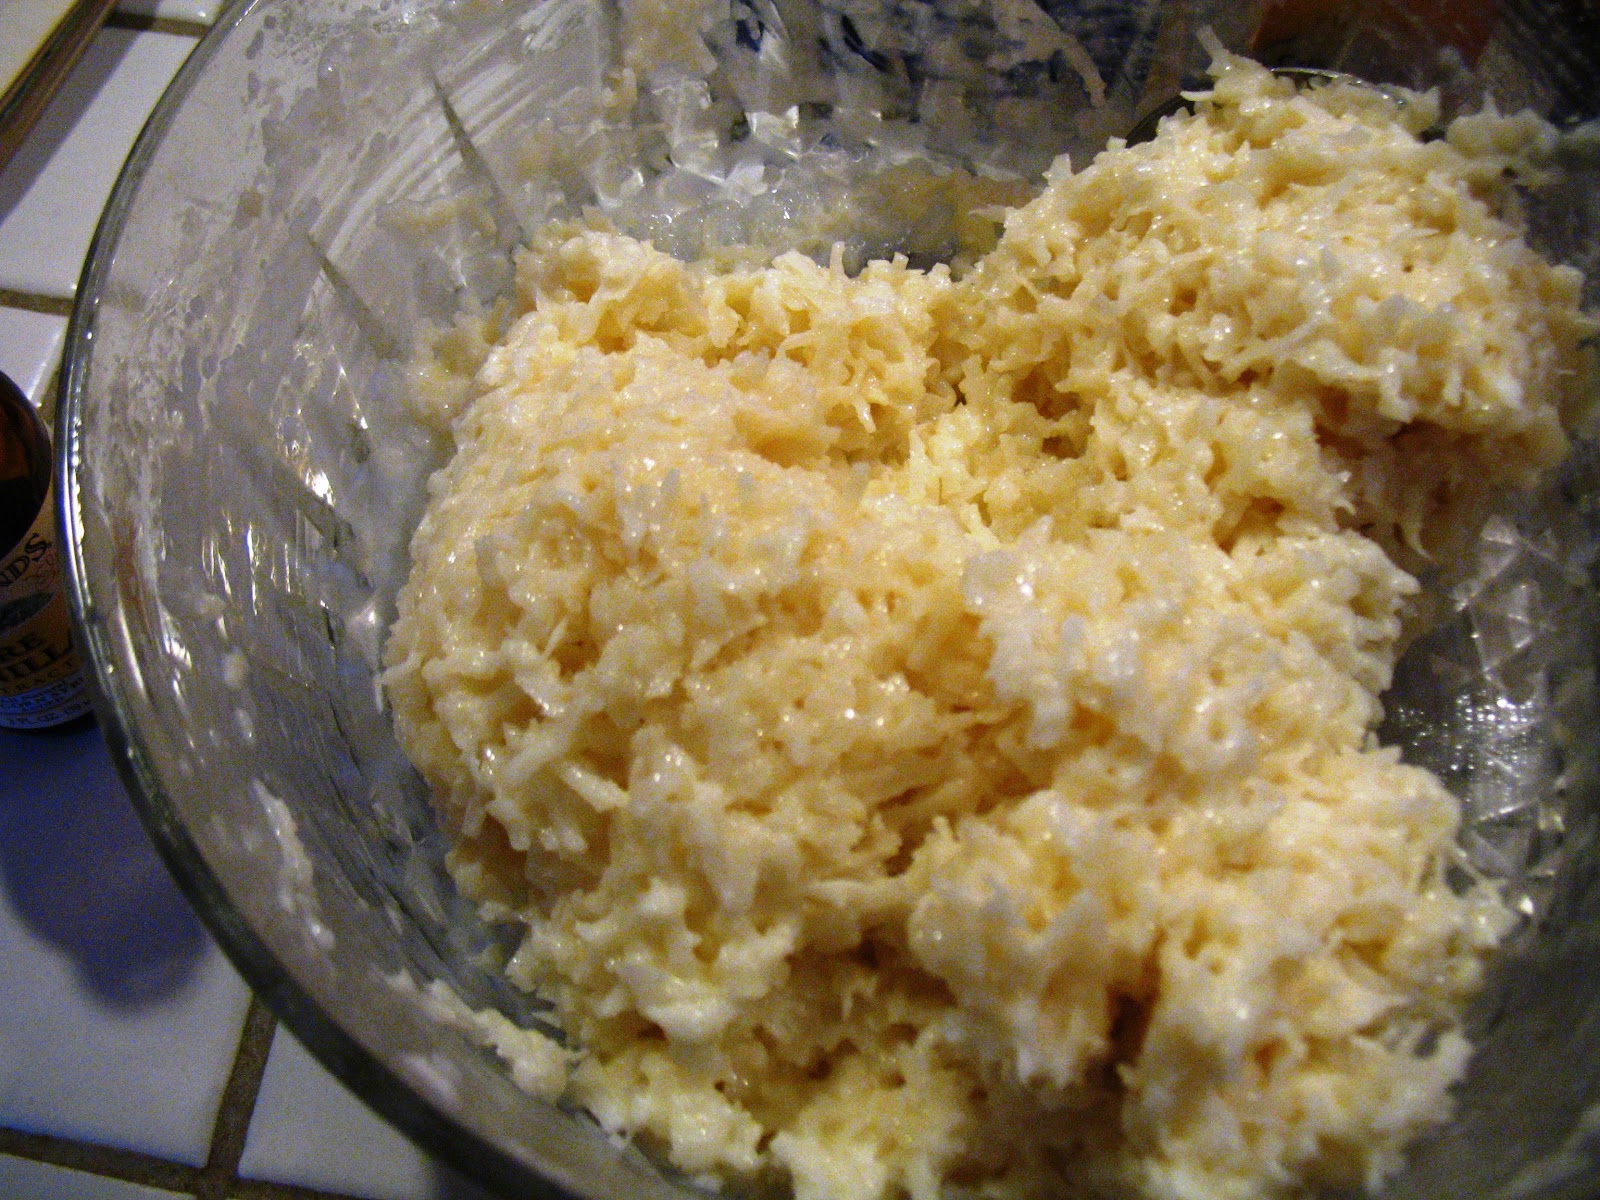
Next, stiffly beat the whites. This should be done using a mixer on a low-medium speed (I had mine at about level 2 out of 5) for several minutes until your liquidy egg whites have become super fluffy.


Beat for about 5 minutes or so and your egg whites will look like...


this!
In a separate bowl, combine the coconut, almond, vanilla, and salt.


Then, add the sweetened condensed milk, to make a thick paste.
Next, fold egg whites into the batter.


Now, roll the paste into balls onto a well-greased cookie sheet about 2 inches apart. Bake 8 to 10 minutes in an oven heated at 350 degrees, until edges are lightly browned.


When they come out of the oven, you have several options. You can leave them just as they are, or place chocolate kisses and marishino cherries on top.


The end result was quite tasty. Be warned, you will need to wash your hands constantly while you handle the eggs. Also, you will be probably tempted like I was to eat much of the dough. It's so delicious throughout the baking process. But your hands will become quite sticky if you keep doing that, so make sure to have lots and lots of soap in your kitchen while you make these cookies.
I highly recommend you make these if you are willing to take the chance. And if you like coconut. And if you're not currently staying in your dorm.

Dorm Food

 Subscribe in a reader

Monday, October 24, 2011

Sometimes I Wanna Be Like Martha Stuart Without the Jail Time


My family (or at least the extended part of my mother's side) gets together about once a month to celebrate birthdays and catch up on everything from political gossip to our actual lives. This month happens to be the month of both my mom and grandma's birthdays, so on Saturday we celebrated that by getting together at my house. Which meant several things. It meant I could see my grandparents and aunts and other assorted family-friends-almost-relatives. It also meant that our house needed to be prepared for everyone to visit. This is where the girl who has nothing better to do (aka me) comes in.
Though cleaning and shopping for food are quite boring, I did create two wonderful things. The first: this bouquet of flowers:

This started with a couple sunflowers from the store, but turned into oh so much more. I added more sunflowers from the garden (which I planted back in June and was quite excited to see still in bloom when I returned from break), as well as geraniums (I think?), a branch of Japanese maple leaves (which were becoming, but still had a hint of green left in them), some hydrangea leaves (which were closer to an orangy red with a green undertone), and several pieces of red barberry bush (I think?) around the outside. I'm quite proud of this floral arrangement, especially since it is mostly composed of flowers I cared for.
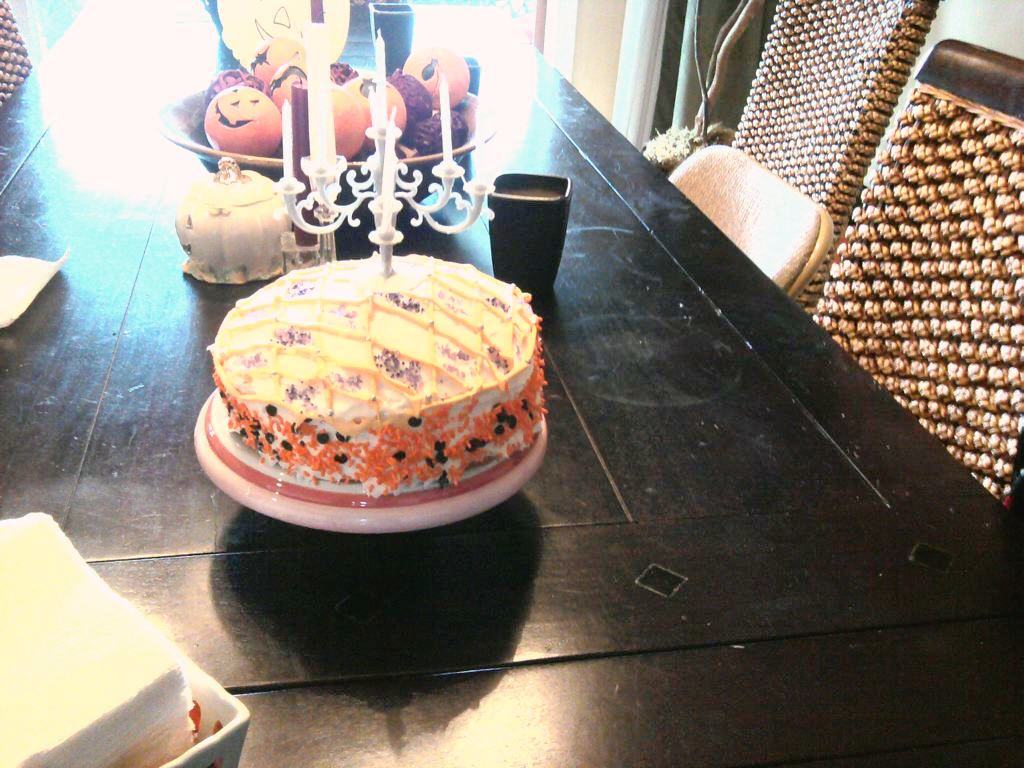
The other thing I'm quite proud of is the cake. I used a Betty Crocker brand French Vanilla cake mix and Pillsbury Whipped Vanilla frosting, but I'm mostly proud of the design. I learned over the summer how to do lattice work on a cake as well as cool borders (though I couldn't do a very cool border because the tube I was using to pipe the frosting was not cooperating). This simply takes the proper tools and a steady hand, which I've been working on. I also learned a couple weeks ago how to decorate the sides of a cake (which has been bothering me for years because it looks so cool but I never could figure out how to do it properly). Apparently, all you do is wash your hands very well and dry them completely; then take about 2/3 of a handful of sprinkles, chopped nuts, or whatever and gently pat it against the sides of the cake. It's important to have some waxed paper beneath the cake to catch whatever falls off the cake. Using a cake pedestal helps as well. I found quite a few videos on youtube on how to do this actually rather simple technique. After the wonderful candles supplied by my aunt, this is what the cake looked like:

When I was finished with both of these (and in a clean-ish house), I felt Martha Stuart-esque, which is quite an awesome feeling. She and Bree Hodge are my power women with all her clever creations (though I do not condone either one's poor personal judgement...hem hem...prison...hem hem...alcoholism...hem hem).

Thursday, October 13, 2011

I Should Be Studying

Sorry I haven't posted all week. Midterms. 'Nuff said.
Seriously, Monday night I was already upset. It's been nothing but midterms, papers, more midterms, and, of course, drama. I am so ready for a break. And luckily, I'm getting one next week.
So, now, a week in food:
Saturday: Saturday doesn't count because I didn't really have anything interesting. Or at least, not that I can remember. I spent much of Saturday writing papers, doing laundry, and studying for my history midterm.
Sunday: Jonathon (my boyfriend), Scotty (my best guy friend), and Elle (my sister) came to visit on Sunday. Elle brought me cookies (of which I've eaten probably about 20...most of which occurred on Monday). I showed them around campus and downtown Portland, which was oh so much fun. For lunch we went to China Town and ate in my favorite restaurant ever (because they serve hot pot, which is this really obscure dish from the Chinese countryside, that basically includes anything and everything in one giant pot and the entire point of it is to keep you warm during the winter...though on a drizzly day in October it's quite delicious as well). Then, after visiting Saturday market, Powell's books, and Jackpot Records, we enjoyed dinner at Henry Weinhard's (so basically, amazing root beer, and a decent burger). Then, when they all left, I stayed up until 3 AM finishing my history paper (which had already been started beforehand).
Monday: Monday was an awful day. Let's just leave it at that. I also ate 10 cookies. And a grilled cheese sandwich. And one string cheese stick.
Tuesday: A somewhat better day. I had a delicious sandwich at the Commons which I plan to inform you all about sometime after this mess ends...so possibly two Tuesdays from now. We'll see. For dinner I had: a pork-based cheeseburger with chili on top (which I didn't finish because it was nasty), seasoned French fries dipped in my bowl of chili, a German chocolate brownie (which was rock hard, again, so I mostly just ate the frosting). I also bought, at the same time, a package of trail mix-type stuff and a Naked smoothie. I seriously looked kind of funny with an overflowing tray of assorted food.
Wednesday: 6 classes in one day (4 in a row this time because workshop added an hour to the beginning). 2 tests in a row, as well as several study sessions. I tried cream of kale soup for lunch, it was ok. And I tried a pizza bagel, which apparently needs to be heated first because it doesn't taste good cold...but I bought it with 5 minutes to get to class so...yeah. Oh, and chocolate pudding for dessert. Goodness I am in love with their chocolate pudding.
And now, today is Thursday: massive midterm day! Who knows what I'll be eating today (perhaps the homemade chicken noodle soup with a salad?) but I have been looking at great recipes to try once I get back from break (and a few cookie that I'll be trying for Christmas this year). Now I'm kind of excited to get back from fall break (and it hasn't even started!)

Friday, September 30, 2011

Des Crêpes du Nutella


J'adore des crêpe et j'adore le nutella. Donc, j'ai partagé avec ma classe de la parole. Avant-hier, j'ai cuisiné avec mon ami. Et nous avons fait beaucoup de crêpes. Désolé. J'ai tendance parler français quand je fais des crêpes....I love crepes and I love nutella. So, I shared with my speech class. The day before yesterday, I cooked with my friend. And we made lots of crepes. Sorry, I have a tendency to speak French when I make crepes.So, yeah, that's what I did Wednesday night after workshop (which ends at 8:10 at night). I ended up staying in the kitchen until about midnight. YAY!But...I made crepes. Which is just so much fun to do because they aren't always successful, but they're almost always delicious.And I'm pretty sure everyone in my class loved them (I was giving a tribute speech to nutella...yeah, I'm a freak). But anyway, here's how to make crepes. They aren't necessarily dorm friendly by any means, but I made it work. Also, the recipe makes about 20 crepes, so this is something to do when you want to make friends.

You will need:


A frying pan
Pam or other spray oil, or butter if you so choose
6 eggs

1/4 Stick of Butter2 cups of flour
Sugar (the original recipe calls for 2 tsp of sugar in 20 crepes, but I probably used more like 4-8 tablespoons...anywhere between these to limits will work)
Salt (about 8 dashes worth...real specific, huh?...this is probably about 1/2 tsp of salt)
4 cups of milk (or 4 of the things of milk they sell at the cafeteria...they're the same amount)


Nutella
KnifeForks (for mixing ingredients, though a wisk would be best if you have one)
Mixing bowl (I used 4 cereal bowls...which is a bad idea)
Spatula (unless you're one of those cool kids who can flip crepes in the air, in which case I hate you)
Recipe:
First, beat the eggs. This is pretty much the same thing as scrambling, if being done with a fork. Just stir it until the eggs are all one color.
Then, add the milk. Again, mix it until it's all one color.
Next, add the dry ingredients. Stir in the flour and add salt and sugar. It's gonna be a bit lumpy. That's only temporarily ok.
While you do this, melt your butter. Stir this into the batter. Seriously stir. Then stir some more. Keep stirring until it is all uniform. Stop for a moment. If anything at any point floats to the top of the batter, mix some more. Make sure there's no flour on the edges either. Really, it should be super thin and uniform.
Once this has finally occurred, heat up your frying pan (which should be greased) on a low to medium, but more like low, heat. As it heats, stir the batter even more. Really, this is an important step.
Put about 2 tbsp of batter into the pan and move the pan in a circular shape so that the bottom is covered entirely with a very thin layer of batter.
When the edges are golden brown, flip the crepe. Then, after about a 45 seconds, check the other side to see if it's done. Both sides should (hopefully) be golden brown. If it's too white, just continue to fry the crepe. Then, put it on a plate.


Repeat this about 4 times (putting something like paper towel between each crepe you put on the plate). Then, regrease the pan.
Do this whole process about 5 times.
And by this point you've wasted several hours and have a rather large stack of crepes.


Pez eyeing the crepes.

Now, you can spread the nutella on them. You can use other things to fill your crepes too (like apple pie filling and cinnamon, lemon juice and powdered sugar, strawberries and whipped cream, bananas pineapple and coconut, whatever you want). Since these are sweet crepes, you should not use meats and cheeses to fill it - it just won't taste right with this recipe. If doing a proper crêpe du Nutella, then be generous with the nutella because nutella is the best thing on earth and you can never have too much nutella.


When you are done with this, eat, share, enjoy, and for the sake of humanity and clenliness: CLEAN UP THE MESS! It's awful to clean up after it gets hard (I know from experience because I missed several spots which are not rock solid clumps of yuckiness). This might need to be done before you eat, share, and enjoy. It is seriously a mess, even if you clean up as you go.
Despite the mess and the fact that it takes several hours, this is so much fun and tastes so good. I recommend trying it if you are a) adventurous, b) not hungry at the moment, c) have a lot of friend, and d) have nothing better to do with your day.
I'm sorry, by the way, for not posting this yesterday. Yesterday was...awful. The fire alarm went off in the middle of the shower. My dr's appointment lasted 1 hour and a half and required getting another 2 vials of blood taken from my body. I couldn't eat anything (and still can't). And everything appeared to be collapsing. Then, when my day finally calmed down, I decided to self inflict personal drama that turned out not to be drama at all and instead was seriously just my imagination (perhaps I'm going insane...maybe that's why my stomach's been hurting so much...this would not be much of a surprise...anyone who knows me knows that I'm completely crazy). Anyway, now tomorrow I have to cross town to determine if my spleen is enlarged (which, if it is, could be a sign of just about anything from mono to infection to blood disorder...

hurray!). On the bright side, if I gain the courage to ask (which knowing myself, I probably won't...I never have the courage to ask questions), I might be able to see the inside of my body tomorrow (which would seriously be the coolest thing ever, ever). We'll see what happens with that.
Anyway, crepes. Yes. Very good. One of the few things my body lets me eat at the moment and I am oh so glad of it. Seriously. Delicious. Enjoy! =)