Monday, October 31, 2011

Edible Jack O'Lantern


Happy Halloween everybody! In celebration of this wonderful holiday, I have created a non-traditional jack o'lantern. You see, us college folks aren't allowed to have the large knives required to carve a pumpkin. And we aren't allowed to light the candle inside the pumpkin. And we don't have a front porch to place them on. So, instead, I made this. It was fairly simple, quite delicious, and close to nutritious. So here's how it works:
First, toast a piece of bread. It doesn't necessarily have to be completely toasted (in fact, I personally prefer it that way), but it needs to be warm and fairly solid (you'll be cutting it into a pumpkin shape later...or now, if you find that easier...which you probably will).
Then, spread a very generous amount of Nutella on your piece of toast. Come on, it's Halloween, you're allowed to get a little out of control.

It'll end up looking like this (except not sideways...I have no idea why my photos sometimes turn sideways when they're being uploaded. I took this picture portrait style. There's no reason it should look like that, and it doesn't when I look at the actual file. hmmmm....maybe there's a phantom haunting my computer....Anyway,)
Next comes the fun part. Making the face. Take a banana and cut it in half length-ways. Then, cut out the curviest part of the banana and use this as the mouth. Cut out pieces to make missing teeth.
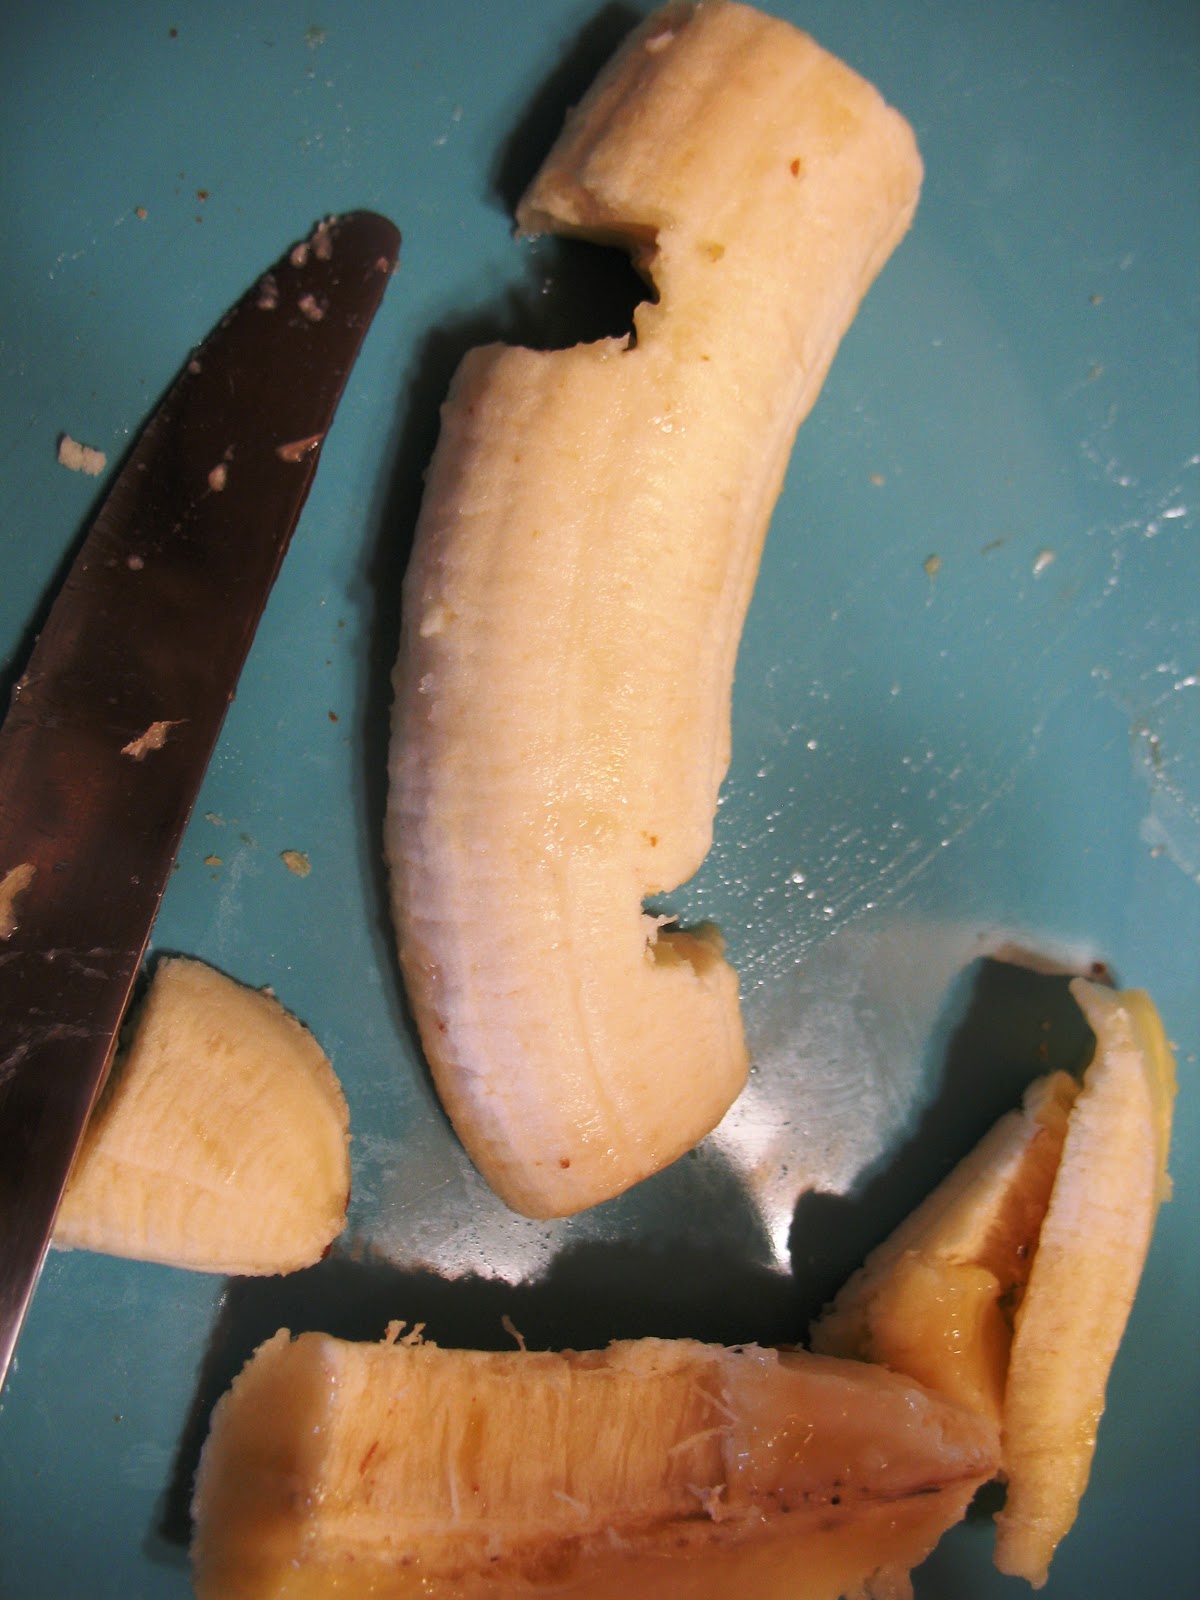
(Again, I have no idea why it appears vertically on here. The file itself is not like that. grrrrr...). Be sure to keep the stem of your banana. Now, place this on your piece of toast where you think the mouth should go. (If you haven't already cut your toast into a pumpkin-shape, make sure to keep some room so you can do this later).
Next comes the eyes. You can use whatever you want/have available for this part. I thought of using cheerios because I happen to have some, but ultimately decided on raspberries because I want to use them before they go bad. I loved how the raspberries turned out, though. It made my jack o'lantern look blood thirsty. To make eyes like mine, using raspberries, first clean your raspberry (you should only need one). Then, slice off the bottom tip. Then, slice the remaining piece in half so that you have two rings.


Now, place these on your jack o'lantern where you think the eyes should go.
For the nose, I used an oddly-shaped banana chip. But you can use whatever nose-shaped food you have lying around. Place this where you think the nose should go.
Next, cut the toast into a pumpkin shape, being careful not to cut the mouth or eyes. (if you haven't done so already).
Finally, use the step of your banana from earlier and place it at the top, so that it acts as the "pumpkin stem".
And, voila: an edible jack o'lantern.

Feel free to eat the scraps as you go (that way you are able to have all the nutrition and deliciousness of a full banana....plus, you paid for this food, why would you want to waste any of it?). And be sure to eat, enjoy, and clean up the mess. Because if you used two plates like I did, there's definitely going to be a mess. And messes like this could be the scariest part of your Halloween.

Dorm Food

 Subscribe in a reader

Sunday, October 30, 2011

(re)Learning a Lesson

I decided in the middle of doing my French homework that I wanted a bagel and cream cheese. Boy, it sounded nice. So, I got out my bagels, opened my cream cheese and...this is what I got:

I apparently learn lessons the hard way, and after having to repeat said hard way over and over again. So, today's lesson: the expiration date doesn't count after you open the package. I learned this lesson before with my fermented pineapple experience (Superstitions), but apparently that lesson didn't stick.
By the way, if you were wondering about the mold, I did some collegiate researching (ok, I googled it), and discovered that mold of any type when found in a soft cheese like cream cheese means that you cannot eat it at all. The green mold is the most common kind and (dare I say) most tolerable (it'll still make you sick, but it won't be scary sick). The red kind is the least common and least tolerable (it's apparently one of the most dangerous kinds of mold out there). So, today I learned two things. Boy, and they say college is a waste of money.


Dorm Food

 Subscribe in a reader

Halloween Cereal


In honor of tomorrow's holiday, I thought I would share my favorite Halloween-related meal: breakfast. Specifically, I thought I should tell you about my favorite Halloween cereal. Every year, General Mills comes out with a line of Monster Cereals, including Count Chocula, Fraken Berry, and Boo Berry (apparently they used to have others as well, but these were discontinued before I was born). Of these, my absolute favorite is Boo Berry. Now, this is odd to me because I typically cannot stand blueberries. But for this, my taste buds make an exception.
Boo Berry Cereal is similar to Lucky Charms in that it is corn cereal with marshmallows. However, unlike Lucky Charms, the cereal doesn't taste like cardboard (though I personally don't mind the cereal-part of Lucky Charms, most people I know can't stand it). Instead, the corn cereal is blueberry flavored (thus the name "Boo Berry").
Boo Berry Cereal is, perhaps, one of my favorite things about Halloween. So, when I saw it was on sale when I was grocery shopping yesterday, I went for it. Don't worry, everything else I got was healthy, so this purchase was totally ok (alright, fine, I did buy a couple bags of candy...and white chocolate covered pretzels...and Cow Pal's cheese and bread sticks...so maybe I didn't buy only healthy things...but I did buy healthy food too, I swear!).
Actually, Boo Berry Cereal is surprisingly not all that bad for you. Comparing it to my other cereal purchase yesterday (Raisin Bran), it has fewer calories, less fat, and about the same or slightly more of nearly every vitamin and mineral on the box (with the exception of iron, since Raisin Bran boasts an impossible to beat 60% of your daily amount of iron). It's still not necessarily good for you, but it's not as unhealthy as you might assume, especially when comparing it to what you would assume to be "healthy" cereal.
Still, the reason I like Boo Berry cereal so much is not it's healthiness or unhealthiness. I like its silliness. The marshmallows and blueberry-flavored cereal are all in the shape of ghosts (with a very strange resemblance of the Pac Man ghosts). And they taste good, which is always a good benefit for food to have.


Dorm Food

 Subscribe in a reader

Saturday, October 29, 2011

How to Make Easy Mac (taste good)

So, this blog has kind of turned into more of a personal blog than a food blog, which is partially because I keep getting food from the cafeteria, rather than making it myself. So, I'm going to try to get back to the old style of things by making my own food as often as possible again (and using my food points to get ingredients at the cafeteria instead of full meals, as often as possible). Today's recipe: Easy Mac.


I tried eating Easy Mac by following the instructions and anyone who's had it before can tell you, it's quite disgusting. It tastes nothing like normal craft mac n' cheese (possibly because it contains none of the same ingredients). So, I did a little research online and found some helpful hints on making Easy Mac edible (Yahoo Answers). A compilation of everything I found that actually sounded edible, turned into this:
First, soak the noodles in warm water (however warm you can get your tap water to become) for about 2 minutes. This will slightly soften the noodles, but most importantly get all the milk powder and other disgusting stuff off the noodles.Be sure to fill the water up to the "Fill to Here" line, to ensure that all the noodles are being properly soaked.


Next, strain the noodles. This is where the strainer I picked up (in Why I Should Pay Attention to Warning Signs) comes in handy.
Then, fill the cup to just below the "Fill to Here" line using ACTUAL MILK (which can be picked up from your cafeteria, if you don't happen to have milk in your fridge).


From here on, comes the hard part. Unfortunately, in order to make Easy Mac taste good, it no longer gets to be easy. However, it's still a single serving of mac n' cheese that you can make on your own (which is the important part anyway).
Microwave the cup for about 30 seconds. Then stir.
Then another 30 seconds. And stir.
Another 30 seconds. Stir.
And yet again, 30 seconds. Stir.
Continue this until the noodles are soft enough to your taste. *NOTE: the milk will eventually start to bubble over. For this reason, try to let it cool completely between each round of microwaving, microwave for no more than 30 seconds at a time, and keep LOTS of paper towels handy. Also, be sure to watch it carefully. Once it starts bubbling over, take it out and clean up the mess immediately. Let it cool completely as you clean the mess because you'll probably need to put it back in for at least another 15 seconds after this point. Try to limit how much you let it boil over, though, because you do want to keep as much of the milk as possible.
Once the noodles are soft enough to your liking, immediately add all of the cheese packet, and stir completely so that there are absolutely no chunks of cheese powder (these taste disgusting, so avoid them like the plague).
Allow it to cool and let stand until it is thickened.
Then, eat, enjoy, and clean up the mess. Luckily, there's no bowl to clean up after this. Unluckily, the microwave will need to be washed thoroughly after you are done with it (I recommend doing this while you let it cool).
The final product should look something like this:


Easy Mac is still not the tastiest of mac n' cheese, but by following this preparation process, it is at least edible. Using the ones that come in cool shapes (mine were SpongeBob) makes your taste buds 10X happier. After all, ma n' cheese is a children's dish, so being a little silly with it is completely acceptable.
For more tips on how to make Easy Mac taste better, I recommend checking out the Yahoo Answers page I cited earlier, as well as this post by JPDsmiley.

Dorm Food

 Subscribe in a reader

Thursday, October 27, 2011

The Italian Grinder Sandwich

It's Thursday! Which can only mean a couple of things. It means the week is almost over; the weekend's almost here. It means tomorrow is Friday, full of infinite possibilities. It means that today I only have 2 classes: Intro to Ed and Speech (I should probably practice my speech that I'm giving today, actually...). It also means that today I get to spend time with my favorite fifth grade class. But more importantly than any of that, it means that today is Italian Grinder Sandwich day.
The Italian Grinder Sandwich is available every day of the week, but I've decided it is only to be eaten on Thursdays and the occasional Tuesday. It is also always, always, always paired with chocolate milk. This makes it the best lunch to prepare me for spending time with the fifth graders. Seriously, it is the best sandwich ever and it can be made rather simply.
All it is (and I mean really all it is, no mayonnaise, mustard, pickles, nothing) is ham, salami, pepperoni, provolone, and lettuce on bread. That's it. The bread, of course, is amazing because I'm pretty sure the school makes their own bread, but even so, simply the combination of meats, provolone, and lettuce...mmmmmmmmm. Honestly, I'm salivating right now. I LOVE THIS SANDWICH!
And when paired with the deliciousness of chocolate milk, really nothing could be better for lunch than this. 

Wednesday, October 26, 2011

Why I Should Remember My Previous Lessons

So, you remember the post I did about warning signs? (Why I Should Always Pay Attention to Warning Signs) And I decided that I would never buy anything that contained meat but didn't require refrigeration? Yeah, well I did anyway.
I was really in the mood for burritos Monday night but I didn't feel like walking all the way to the cafeteria. So, luckily, I purchased some premade Mexican over Fall Break. Old El Paso just came out with a new line of premade burrito stuffers. I read reviews of it online and it sounded like a good idea. It was easy enough to make and I could keep the leftovers in the fridge while I finished eating them throughout the week. To make it, all you have to do is rip open the top of the plastic package and put it in the microwave for a couple minutes. Then, put it on a tortilla (folding tortillas is an easier task if they have been warmed in the microwave for about 15-20 seconds), and maybe add a little cheese or lettuce or whatever, so that it looks like this:


It's already got rice, beans, and meat in it, which makes it quite convenient since to make burritos the normal way, you would need a different pot for each of these items. Once you have your inners on the tortilla (on one half only, fold the burrito. To do this properly, you must first fold the two ends so that each end of your string of insides are covered (this ensures that your beans and stuff won't fall out while you're eating your burrito). Then, roll the burrito starting with the half that has the insides on it, going towards the blank part of the tortilla. It should end up looking something like this:


Then, in theory, you should eat it, enjoy it, and clean up the mess.
Here's where the problem lies: I did not enjoy it. It was super salty, a tad bit spicy, and underlyingly bland. I dumped the leftovers in the trash and it stunk up our whole room. I couldn't take more than 2 bites of it. So, in the end, I walked all the way to the cafeteria and picked up a burrito anyway. Where I learned that, while I really love their chicken burritos, I am not a fan of their beef (it's rather spicy and I'm just not fond of spices).


Dorm Food

 Subscribe in a reader

Monday, October 24, 2011

Sometimes I Wanna Be Like Martha Stuart Without the Jail Time


My family (or at least the extended part of my mother's side) gets together about once a month to celebrate birthdays and catch up on everything from political gossip to our actual lives. This month happens to be the month of both my mom and grandma's birthdays, so on Saturday we celebrated that by getting together at my house. Which meant several things. It meant I could see my grandparents and aunts and other assorted family-friends-almost-relatives. It also meant that our house needed to be prepared for everyone to visit. This is where the girl who has nothing better to do (aka me) comes in.
Though cleaning and shopping for food are quite boring, I did create two wonderful things. The first: this bouquet of flowers:

This started with a couple sunflowers from the store, but turned into oh so much more. I added more sunflowers from the garden (which I planted back in June and was quite excited to see still in bloom when I returned from break), as well as geraniums (I think?), a branch of Japanese maple leaves (which were becoming, but still had a hint of green left in them), some hydrangea leaves (which were closer to an orangy red with a green undertone), and several pieces of red barberry bush (I think?) around the outside. I'm quite proud of this floral arrangement, especially since it is mostly composed of flowers I cared for.
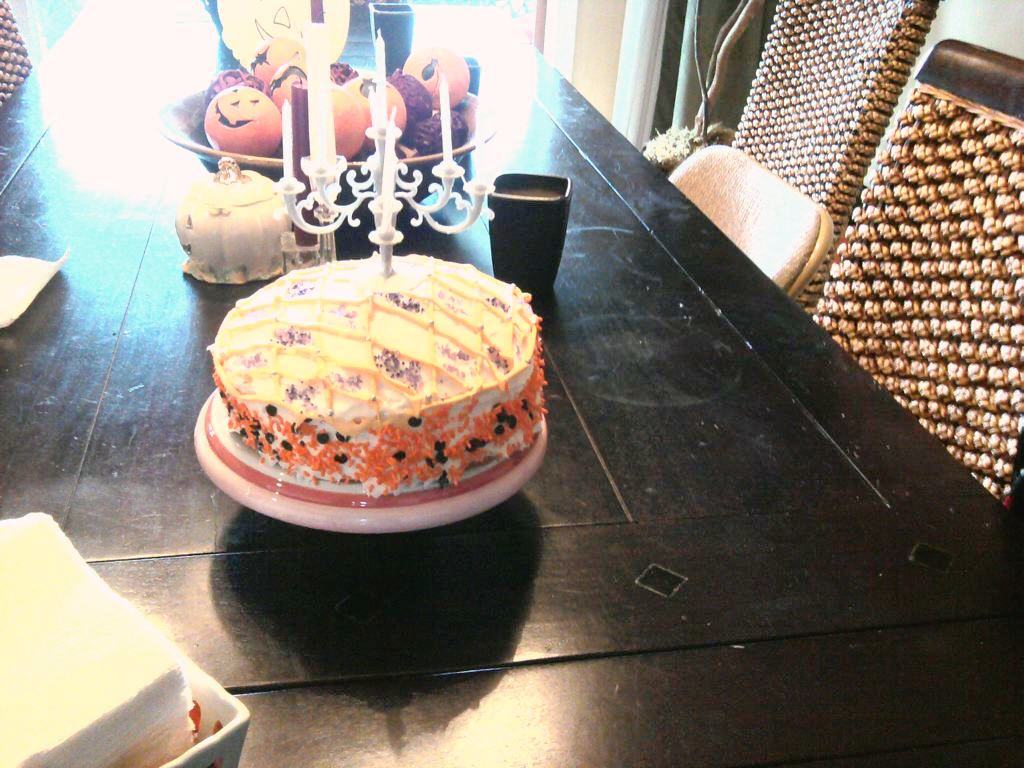
The other thing I'm quite proud of is the cake. I used a Betty Crocker brand French Vanilla cake mix and Pillsbury Whipped Vanilla frosting, but I'm mostly proud of the design. I learned over the summer how to do lattice work on a cake as well as cool borders (though I couldn't do a very cool border because the tube I was using to pipe the frosting was not cooperating). This simply takes the proper tools and a steady hand, which I've been working on. I also learned a couple weeks ago how to decorate the sides of a cake (which has been bothering me for years because it looks so cool but I never could figure out how to do it properly). Apparently, all you do is wash your hands very well and dry them completely; then take about 2/3 of a handful of sprinkles, chopped nuts, or whatever and gently pat it against the sides of the cake. It's important to have some waxed paper beneath the cake to catch whatever falls off the cake. Using a cake pedestal helps as well. I found quite a few videos on youtube on how to do this actually rather simple technique. After the wonderful candles supplied by my aunt, this is what the cake looked like:

When I was finished with both of these (and in a clean-ish house), I felt Martha Stuart-esque, which is quite an awesome feeling. She and Bree Hodge are my power women with all her clever creations (though I do not condone either one's poor personal judgement...hem hem...prison...hem hem...alcoholism...hem hem).