Monday, November 18, 2013

Spinach Au Gratin


You probably already know that spinach is good for you. And I'm probably the only person in the world who actually likes it. But even if you don't, or especially if you don't, this spinach au gratin recipe is perfect for you. What's better than covering a vegetable with cheese? Making it low-fat and guilt free, that's what.
This recipe is adapted from Skinny Taste, which was a makeover recipe from Barefoot Contessa. Both recipes say it's the perfect recipe for the holidays. And I believe them. However, it's also good to make as a mini-meal or side dish. In fact, I reheated a large helping of it for dinner last night and was fully satisfied. It also went great with sweet apple chicken sausage. Make it on Sunday and reheat it for the next week and you'll be a well fed college student.


Ingredients:
4 Tablespoons of light butter
1 cup of finely chopped onion (about half an onion)
1/4 cup of flour
1/3 teaspoon of nutmeg
3 cups of fat free or low fat milk
3 pounds (3 16-oz packages) of chopped spinach, defrosted.
3/4 cup of grated Parmesan cheese
1 Tablespoon of salt
Black pepper (to taste, 1/2 teaspoon is recommended, but I didn't use any at all)
3/4 cup of shredded Swiss Gruyere cheese

Recipe:
First, drain the previously frozen but now defrosted spinach. To do this, put one bag at a time into a strainer and mash it with a potato masher, large slotted spoon, or a fork, to drain all the excess liquid. Move to a large bowl and then do the next bag. Alternatively, the comment section on the Skinny Taste post had the suggestion of using a potato ricer. Do whatever you have to do to drain as much liquid as you can from the spinach.
Next, melt the butter in a large saute pan. Saute the onions over a medium heat for about 10 minutes, until the onions are translucent.
Then, add the flour and the nutmeg. Cook for about 2 more minutes while stirring occasionally.
After 2 minutes, add the milk. Cook for about 5 more minutes, while the mixture thickens.
At this point you should begin to preheat the oven to 425 degrees.
Then, slowly stir the spinach into the mixture. Add in 1/2 a cup of Parmesan cheese and 1/4 cup of Swiss Gruyere cheese..
Next, spoon this into a large casserole dish. Spread it evenly, then cover with the remaining 1/4 cup of Parmesan and 1/2 cup of Swiss Gruyere cheeses.
Then, place on the center rack of your oven and bake for about 20 minutes, until the cheese has melted and it becomes hot and bubbly. You'll be able to tell when it's ready, don't worry.
Allow to cool slightly before serving. And enjoy. My goodness you should enjoy this recipe because it is delicious.

I'm still trying to decide if it's worth trying to make this on Thanksgiving. It is not the kind of dish that can be prepared ahead of time and I don't want to crowd an already crowded kitchen. However, I do highly suggest this recipe and I recommend trying it if you have the time and the kitchen ability.
This is definitely not a dorm-friendly recipe. But it is good for any student living off-campus or anyone trying to prepare something when they are home for the holidays.

Sunday, November 17, 2013

Grown Up Mac and Dogs

Ok, so you already know how much I love sweet apple chicken sausage. But, you should know that my absolute favorite food in the whole wide world is four cheese corkscrew pasta, you know like the kind that comes from a box? I guess I have a pretty simple palate. When I was little, my mom used to make Mac and Dogs, using four cheese corkscrew pasta, sliced up hot dogs, about 1/2 a Tablespoon of Dijon mustard. As a kid, I would have eaten the whole pot if my mom didn't stop me.
Now that I'm all grown up, the only thing that stops me from eating a whole pot is the fact that I would like to fit all of my jeans tomorrow, please. Well, that and the fact that until recently I could no find any Pasta-Roni four cheese corkscrew pasta. Which is horribly depressing because it's my favorite food in the whole wide world. The other day, just by happy coincidence, I was shopping at a different grocery store. And while I was in the mac and cheese aisle, I happened upon a small collection of that beautiful blue box. It wasn't with the Rice-A-Roni, or with pasta, but with the mac and cheese, right under a box of Velveeta mac and cheese.
So, of course, I bought a box, even though it wasn't on sale or anything. And right away I decided to make some for dinner. But, when I got home I realized I didn't have any hot dogs. Woah is me, right? So, I decided to try it with sweet apple chicken sausage instead. And I must say, it tasted better this way.


Ingredients:
1 box of four cheese corkscrew noodles (I used Pasta-Roni)
1 1/2 cups water
3/4 cups of milk
2 Tablespoons of butter
1 sweet apple chicken sausage, sliced
1/2 Tablespoon of Dijon mustard * (Optional)

Recipe:
First, bring the water, milk, and butter to a boil. Yes, it does actually have to be 1 1/2 cups of water. Be precise.
As it comes to a boil, heat and prepare chicken sausage. I used a pre-cooked sausage this time, which meant it just had to be microwaved for a minute.
Once it is boiling, slowly add the noodles and special seasoning. Return this to a boil.
Reduce heat to a medium heat and boil, uncovered, for about 7 minutes, stirring frequently.
After 7 minutes, stir in the slices of chicken sausage. If desired, add in the mustard at this point as well. Let sit for about 5 minutes while the sauce thickens. Be patient with this because it makes all the difference.

If I was on death row and had one last meal before I died, I would probably request this. And steak. And lobster. And cake. And cookies. And cookie dough ice cream. And whipped cream. And an entire container of sprinkles. I would cause a lot of trouble if I was on death row.
Anyway, I highly recommend that you try this recipe. It's simple, but it's delicious. Sometimes simple is good.

Monday, November 11, 2013

Battle of the Pies

So, as you probably have read, I have been making pies in preparation for Thanksgiving. And I can't decide which one to make. I narrowed it down to two: Caramel Apple Pie and Blackberry Apple Pie. But now I need your help. Which of these wonderful pies should I make? Fill out the survey here to give your opinion, and voice any questions or comments in the comment section below (or on the posts for either of the pies).
And now, some information about our contenders.


Contender Number 1 is quite rich. He blends well with the other rich fall flavors to be expected at Thanksgiving, including pumpkin and pecan pies. If you weren't full before dessert, you will be after eating this pie. Completed with caramel drizzle, this pie is sure to be enjoyed until your gut explodes, which is both good and bad. Contender Number 1 is certainly a heavy weight Thanksgiving Pie, both in richness of flavor and caloric weight.

Contender Number 2 is a humble fellow. He isn't rich, which makes him unique on the Thanksgiving desert table. What he lacks in richness, Contender number 2 makes up for with a certain tart sweetness. Unlike Contender Number 1, Contender Number 2 is patient and is therefore willing to wait until a more appropriate season before being devoured.


So, who will win in this ultimate battle of the pies? Only time and a survey will tell.

Blackberry Apple Pie


In quite the contest against this pie, I decided to try one other pie recipe.This recipe is for blackberry apple pie, thanks to the wonderful Martha Stuart (who, as I've mentioned previously is one of my idols). The original recipe can be found here, though I made a few adaptations.

Ingredients:
1/4 cup sugar
1/4 cup flour
1/2 teaspoon ground cinnamon
1/4 teaspoon salt
5 1/2 cups of assorted apples, peeled and thinly sliced (again, try crisp and tart apples such as Granny Smith, Gala, Honeycrisp, and Jonagold)
10 ounces (2 1/4 cups) of fresh or frozen blackberries, thawed

Recipe:
First, wash, peel, and slice (in that order) your apples. I strongly recommend using Granny Smith and at least one other type of apple. To slice, I took an apple cutter like this to slice the peeled apples. Then, I sliced each of these pieces in half, thirds, or quarters, depending on the size of the slice. 
Next, whisk together the sugar, flour, cinnamon, and salt in a large bowl.
Then, add the apples and mostly drained blackberries and toss to coat (I forgot to drain my blackberries and ended up with a very runny pie).
Preheat the oven to 375 degrees.
While the oven preheats, spoon the filling into a prepared pie crust. Be sure with this pie that you either cover the top with more crust (latticed, designed, or completely covered with some holes) or cover in tin foil for the first 40 minutes of baking.
Bake for 50 to 60 minutes (removing tin foil after 40 minutes, if applicable).


This pie. Oh my this pie. If I don't make it again for Thanksgiving, I'll definitely be making it at some point again (maybe in the summer). It's definitely sweet, but more on the tart side of sweet. The blackberry and the apple compliment each other splendidly. I highly recommend that you try this recipe. But it is definitely more of a summer pie (perhaps late August/early September when blackberries are still in season at the grocery store).
Please, again, leave any questions or opinions in the comment section below. A survey post is soon to follow. I look forward to seeing your views on this ultimate of questions: WHICH PIE SHOULD I MAKE?!

Caramel Apple Pie


After making my first pie a little while ago and being rather successful at it, my mother requested that I make another pie for Thanksgiving this year. I filled up my pinterest boards with way too many pie recipes. Then, I narrowed it down to two: caramel apple pie or blackberry apple pie. I'm going to need your help deciding which one to make, so look for the upcoming post where I will include a survey. But that's all later. For now, here is the caramel apple pie (recipe adapted from Pillsbury):

Ingredients:
Pie crust (frozen, homemade, or refrigerated)
1 cup sugar
1/3 cup flour
1 teaspoon ground cinnamon
5 cups of peeled and thinly sliced apples (use a variety of tart and crispy apples, I used Granny Smith, Gala, and Honeycrisp)
1/2 cup caramel apple dip (I used Light dip because that's all I could find)
5 Tablespoons milk
(Optional)
1 cup flour
1/2 cup brown sugar
1/4 cup softened butter

Recipe:
First, wash, peel, and slice (in that order) your apples. I strongly recommend using Granny Smith and at least one other type of apple. To slice, I took an apple cutter like this to slice the peeled apples. Then, I sliced each of these pieces in half, thirds, or quarters, depending on the size of the slice.
In a large bowl, mix sugar, 1/3 cup of flour, and cinnamon in a large bowl. Add the apples and toss to coat.. Spoon this pie filling into the crust.
In a small bowl, mix about 3 Tablespoons of caramel apple dip with about 3 Tablespoons of milk. Mix thoroughly, adding more caramel to make thicker, or more milk to make thinner. Drizzle this over the pie.
Preheat the oven to 375 degrees.
While the oven preheats, mix 1 cup of flour, the brown sugar, and the butter in a medium sized bowl to create a crumb topping. Sprinkle this topping over your pie filling. This is an optional step, but you should either use this or have a top to your pie (be it a latticed top or a solid top with holes punched in it, or what have you).
Next, bake for about 50 to 60 minutes, or until the pie is golden brown. Allow the pie to cool for 10 minutes.
After the pie has cooled, take your remaining caramel apple dip and add more caramel and/or milk 1 Tablespoon at a time, until it is a sufficient amount. Then, drizzle the caramel over the cooled pie.
It is recommended that you allow the pie to cool for at least 2 hours before serving.


This is a very good autumn pie. The caramel was sweet without being too sweet, and the apple was tart without being too tart. It was also extremely rich tasting, which is both good and bad.
So, here is pie number one. Pie number two is soon to follow. Please leave any questions or opinions in the comment section below.

Wednesday, October 30, 2013

Halloween Cake


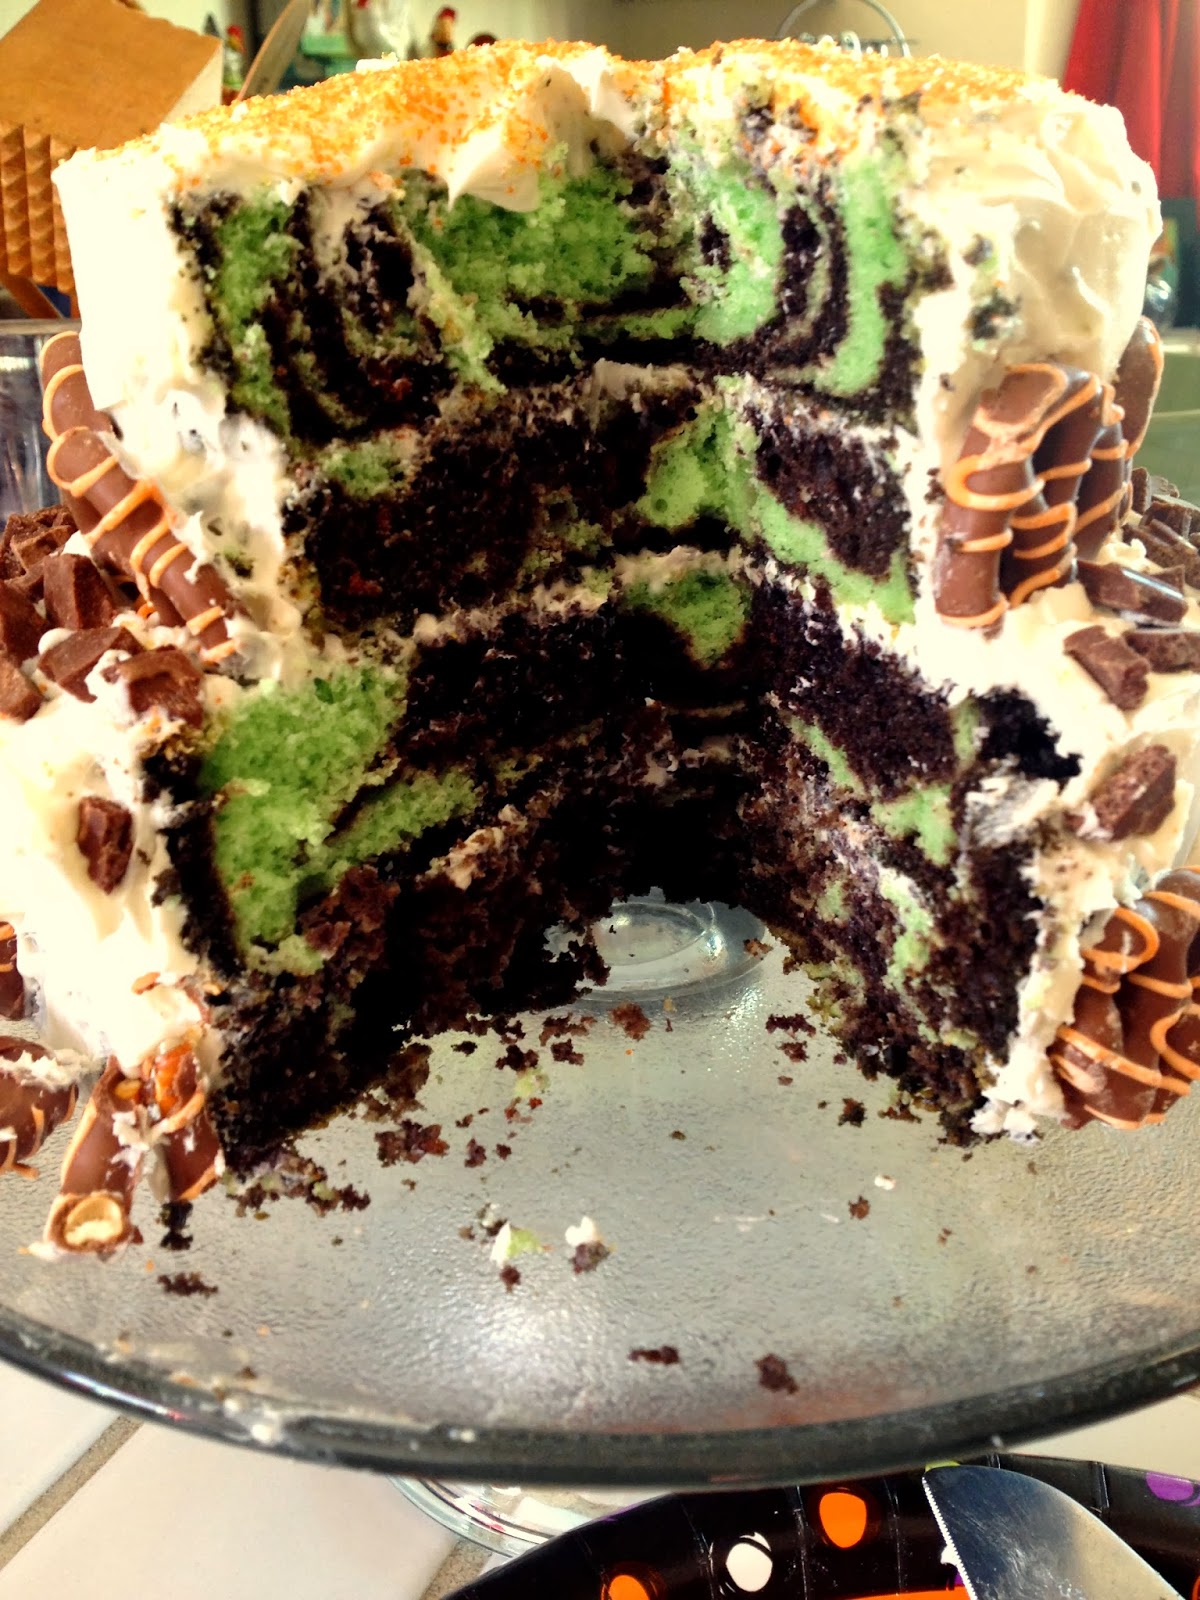
My mother's birthday is Halloween. You may remember that from the last time I made a cake for her birthday. Last time I tried my hand at latticed frosting, but this time my experimentation wasn't immediately obvious. The cake sat out on the counter looking pretty for most of our family gathering. My grandmother even commented on the cake to my mother, thinking it had been purchased from a bakery. Now, that makes me feel just a little bit of pride. Especially since, really, it looked like a simple tiered cake, with white frosting, orange sprinkles on top, store bought chocolate covered pretzels on the side, and chunks of broken Hershey's bars on the bottom tier.
The surprise came later, when we finally cut the cake. I had been waiting eagerly while my aunts and grandparents and siblings and assorted guests discussed, well, just about everything. Come on, get to the cake, I kept thinking impatiently. But finally, it was time. 
Are you ready for the surprise about this cake? Well, find your seats everybody. It's time for the grande finalle:


Bet you didn't see that one coming, did you?
For this cake, I decided to try my hand at making a zebra cake. I tried teaching myself, which went ok. I made a purple zebra cake for a second time the next week for a friend's birthday adapting the directions from King Arthur Flour and it went much better. The key is to make one of the two batters thinner than the other, so that it will spread when given the weight of the thicker cake batter. If made properly and with white cake instead of green cake (thank you food dye), it will look more like an actual zebra, which is great for kid's birthdays. Anyway, let's cut to the chase. Here's the proper way to make a zebra cake.

Ingredients:
2 cake mixes (1 chocolate and 1 white)
7 eggs (yes, you read that right, 7 eggs)
Black food dye (optional but recommended)
2 2/3 cups milk
1 cup vegetable oil (or for a richer cake, use melted butter)

Recipe:
In one medium-large bowl, mix together white cake mix, 3 egg whites (do not include the yokes!), 1 1/3 cup of milk, and 1/2 of vegetable oil or butter. Mix well using a mixer.
In another medium-large bowl, mix together chocolate cake mix, 4 whole eggs, 1 1/3 cup of milk, 1/2 of vegetable oil or butter, and several drops of black food dye.
In a greased, round cake pan place 2 large spoonfuls of the thinner white cake mix, directly to the center of the pan.
Then, on top of that, place 2 large spoonfuls of the thicker chocolate cake mix, directly in the center of the white cake mix, so that it looks like a bulls eye.
Place 2 large spoonfuls of white cake mix in the center on top of that, then 2 large spoonfuls of chocolate in the center on top of that, and so on and so forth. Watch as the thinner batter continues to spread under the weight of the thicker chocolate batter. Be warned, this is enough cake batter to make a 4 layered cake. If desired, you may make a two layer cake and use the left over batter to make both vanilla and chocolate cupcakes. Or, do what I did and make a tiered 4 layer cake, using 2 round cake pans of different sizes, then just eat the cake batter that's left over. Yummy.
Bake according to the directions on the box (typically 350 degrees for anywhere between 28 and 28 minutes depending on the size of the cake pan). The cake is ready when a toothpick can be inserted into the center of the cake and removed cleanly or with crumbs. Then remove from the oven and allow to cool.
After cooling, frost and layer the cake according to whatever grand master plan you have created. Then decorate as desired.


This cake was deliciously moist and looked SO COOL! I highly recommending making a cake like this. It's so much more fun than a marbled cake. It looks incredibly impressive. And it's super easy! Seriously, making this kind of cake will change your life. You'll never want bake a cake any other way again!


Monday, September 30, 2013

Banana Chocolate Chip Muffins

I was in a baking mood the other day. Ok, I'm always in a baking mood. I also had some very ripe bananas sitting out, waiting to be used for something. I could have made my Vegan Banana Bread recipe, but that just didn't seem quite enough. I needed chocolate. So, I wandered around the baking aisle of the grocery store until I found something to make the perfect dorm/college friendly recipe. Martha White makes chocolate chip muffin mix in small enough to make only 6 muffins at a time. Of course, this recipe makes 12 because I added to it. Even so, that's a small amount of muffins when you're only cooking for yourself.


Ingredients:
Martha White - Chocolate chip muffin mix
2 ripe bananas
1/2 cup 1% milk

Recipe:
First, peel and mash the bananas in a medium sized mixing bowl. This part is really fun and a great way to relieve stress. Mash the heck out of them using whatever tools you have (a fork, a spatula, a slotted spoon, whatever).
Next, preheat the oven according to the packaging, most likely around 425 degrees.
While the oven preheats, mix the bananas with the muffin mix and milk.
Place 12 muffin tins (pre-made or dorm-made like this) in a muffin pan. Scoop approximately 2 Tablespoons of batter into each tin.
Bake for approximately 12-14 minutes, or until a toothpick inserted into the muffin comes out clean or with crumbs. Then, remove from the oven and allow to cool before serving.


This recipe is great for college baking. It makes only 12 muffins, so you are able to share with a few friends and keep a few for yourself, without wasting any by allowing them to go stale. They're also great because they're relatively healthy compared to other muffins. Muffins made with recipe contain only 97 calories each (compared to 160 calories). Plus, they contain calcium, vitamin B, and vitamin B12 from the milk and mix and potassium and fiber from the bananas. And, as an added bonus, they actually taste good! Enjoy for breakfast with a side of fruit and a glass of milk to start your day right, as a healthy snack between classes, or as a post-exam treat.