Saturday, October 22, 2016

Oktoberquest - A Questival

Hi guys! It's been a while since I posted. Sorry about that. Here's an update: I'm at UP again! Only not physically at the moment. I'm in the PACE program and have been placed as a teacher in Salt Lake City, Utah.
My roommates and I have decided to participate in an incredible adventure - Oktoberquest. Oktoberquest is a Questival, which is kind of like an adult scavenger hunt. It's such a great way for us to explore this new city that we call home for two years.

Here's a picture of my roommate enjoying her pizza at the festival's kickoff event.


If you wish to support us, download the Cotopaxi judging app, Llama Judge. Search Cotopaxi to find it in the app store. Then, vote for our team, Winston's Angels!

Thanks for all your help guys!

Wednesday, March 19, 2014

The Cheaters Bacon White Cheddar Pasta


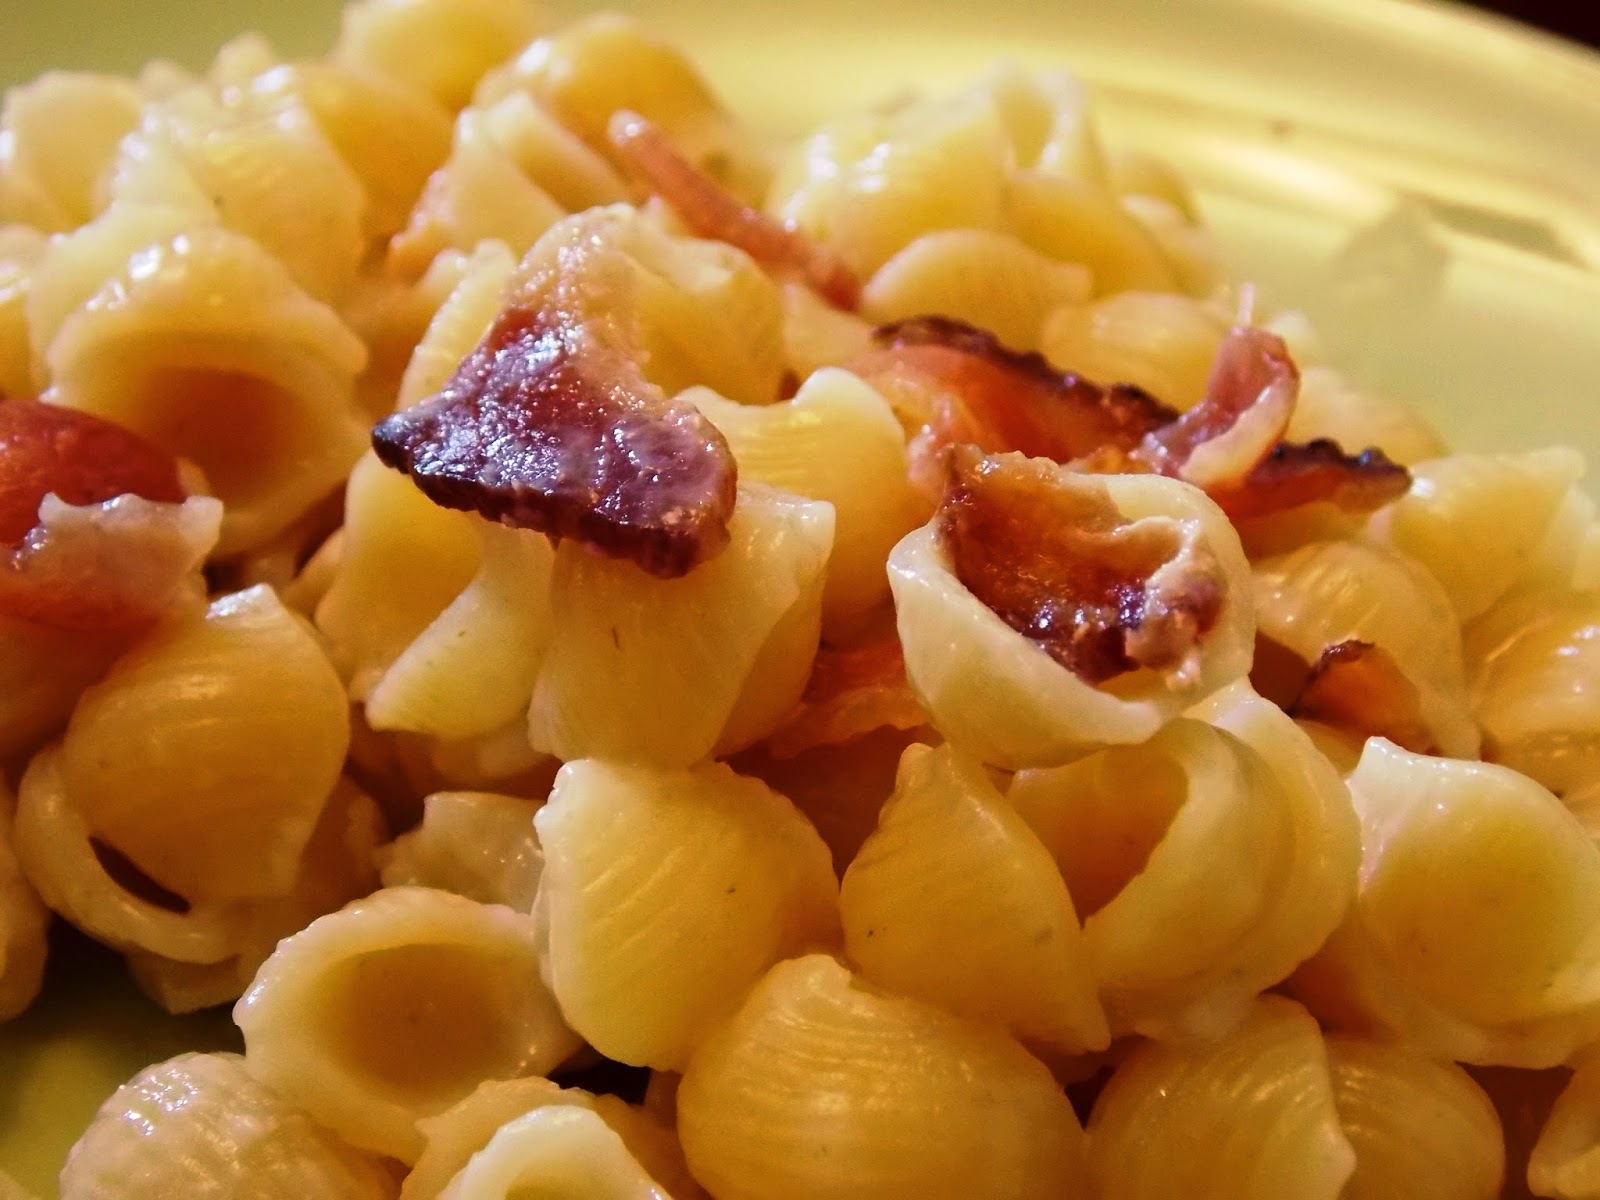
Okay, as a good Catholic school student, I must confess. I cheated on Lent already. One of the few things I gave up was prepackaged foods. I knew going into it that it would be difficult. But I had no idea it would be THIS difficult. No frozen pizzas, no canned soups, no boxed dinners. Anything that was already a meal before it was packaged is now off limits (that means milk and cheese are ok, but a frozen burrito is no bueno). That being said, I think I only barely cheated on this one. I mean, yes, I used a boxed mac and cheese mix, but, I also fried up bacon to crumple into it. I mean, that has to count for something, right? Also, I was starving, it's cold outside, and I just wanted something warm in my stomach. Anyways, I'm still sorry, Lent Gods (or, I guess singular God...also, specifying Lent God is probably not necessary, as I'm pretty sure Lent God is the same as everyday regular God-God).

Ingredients:
1 box Annie's white cheddar shells (or similar, but seriously, I can't get enough of this brand)
6 cups of water
2 Tablespoons low fat butter
1 Tablespoon fat free milk
1 or 2 pieces of bacon


Recipe:
Prepare 1 box of mac and cheese according to the recipe on the back of the box. I prefer to do so with a ratio of 2 Tablespoons of low fat butter and 1 Tablespoon of fat free milk, but the ultimate goal is just to get 3 Tablespoons of something in there, preferably dairy. I even know people who use yogurt.
As you prepare your pasta (probably while you're boiling the water and the noodles), cook 1 or 2 slices of bacon. When grilled, remove from your frying pan onto a place with a piece of paper towel.
Allow bacon to cool slightly. Then, crumple bacon, protecting your fingers by using the paper towel and folding it over so that you make a bacon-paper towel sandwich, then snap bacon repeatedly.
Once your bacon is crumpled, add to your pasta, with cheese mix, milk, and butter. Stir together, then serve. This should be about 2 or 3 servings.
If you chose to save leftovers, reheat in the microwave with a small splash of milk.


Yes, technically, it's still boxed. But at the point that you have dirtied up a pot, strainer, frying pan, spatula, mixing spoon, Tablespoon, plates, and a fork, is it really a prepackaged meal? I mean, I did all the work, right? :P

Saturday, February 8, 2014

Baked Sweet Potato Fries

When my roommate told me how to make these delicious fries, I nearly cried. I loved them so much and I had no idea they were so easy to make. The most difficult part of this entire recipe is actually cutting the sweet potato. So, it's important that you select a sweet potato that's not very firm, and therefore easier to slice. Seriously, once you slice the sweet potato, there's like maybe 30 seconds of work to do. Now, if that's not college food, I don't know what is.

Ingredients:
1 sweet potato (or orange/yellow yam)
1 Tablespoon of olive oil
A dash or two of sea salt or other type of salt

Recipe:
Wash your sweet potato. There's a ton of nutrition and taste in the skin, so you'll need to scrub some of the dirt and germs from the outside, while maintaining the integrity of the skin as much as possible.
Slice your sweet potato into strips in whatever your desired thickness. I prefer thinly sliced fries, but my sister prefers thicker fries. Either way works, it's really up to you. Do note, however, that they will shrivel some while baking.
Preheat your oven to 450 degrees.
In a small or medium mixing bowl, toss your sliced sweet potato with about 1 Tablespoon of olive oil and a dash or so of salt. I prefer sea salt, but it works well with garlic salt or other seasoning salts. Feel free to explore a variety of flavor opportunities.
Allow your fries to sit while you line a baking sheet with aluminum foil or parchment paper. Trust me, you don't want to skip this step because otherwise you risk ruining your baking sheet.
If your fries feel oily, spread them them across the baking sheet. Otherwise, sprinkle just a bit more olive oil to the sheet before putting the fries on.
Bake for about 10 to 20 minutes, flipping every 5 minutes. How long you bake your fries also depends on your personal preference. Bake for less time if you prefer softer fries. Bake for longer if you prefer crispier fries.
When your fries are to your personal preference, remove them and let cool for about 5 minutes before serving. These taste great on their own, with honey mustard, ketchup, or barbecue sauce.


These fries are oh so tasty. And the best part is, they're actually pretty good for you. Not only are they baked instead of deep fried like traditional fries, but sweet potatoes and olive oil are actually packed full of good nutrients for your skin and hair. This is a delicious alternative to your standard deep fried potato fries.

Saturday, February 1, 2014

3 Ingredient Apple Berry Muffins

Ok, ok, I know. Using a mix as an ingredient is kind of cheating. If you're offended by that, I'm sorry, but this is not the blog for you. But, you know what, I'm not sorry. You can make this for under 25 cents per muffin. That, my friends, isn't cheating. It's just plain street smarts.


You might notice the nifty silicon baking cups I used to make these. My incredible cousin got me these for Christmas and this was my first time baking with them. I must say, they are incredible. They're safe to put in the dishwasher, and they're SUPER cute. I still haven't decided if you're supposed to take your muffins or cupcakes out of the baking cups before serving them. The muffins popped right out, so I suppose that's by design? If anyone knows, please comment to let me know.
I chose to do blue and green colors today because of this little thing called the Super Bowl (you might have heard something about the Seahawks playing?). I'm a wee bit excited, even though I don't even have a TV to watch the game on. I'm lame, I know. So, in celebration of my team making it to the Super Bowl, these muffins include Seahawk colors and Washington state apples. The berries probably come from California, but whatever. As long as they didn't come from Colorado, I suppose I'm ok.

Ingredients:
1 Mini Package of Betty Crocker Triple Berry Muffin Mix (makes 6 muffins)
1/4 Apple (I recommend Fuji or Honey Crisp)
1/8 teaspoon of Baking Soda
1/2 Cup Water

Recipe:
Preheat the oven to 400 degrees (375 if using dark or non-stick pans, including these silicon cups).
Cut and core an apple, then use 1/4 of the apple (about 2 slices). Roughly cut off the skins (no need for precision here). Then dice or cube, depending on how large you want the pieces of apples to be.
In a medium-sized bowl, mix together muffin mix, apple, baking soda, and water. Let sit while the oven preheats. The baking soda should neutralize the acid in the apple twice, once when combined and sitting, then once when it is heated in the oven. Baking is a science, yo!
Once the oven has heated, spoon mix evenly into 6 baking cups (paper or silicon). Then place in the oven for 16-20 minutes, until the top is golden brown and a toothpick inserted in the center comes out cleanly.
Allow them to cool, then serve and enjoy.


These were delicious muffins. And the perfect amount for a college student or single bachelor. No waste here. And now you'll have a few days worth of on-the-go breakfasts, snacks, or healthy treats.


Sunday, January 26, 2014

College Monte Cristo

I always find myself throwing away the heels to my bread, which is ridiculously wasteful. The way I think of it, I probably waste about a loaf or two every year, simply because I don't eat the heels. But, I mean, it's not my fault the heel is so gross. So what is a girl supposed to do? Well, now I've got an answer. This solution stems very, very loosely from a recipe by Closet Cooking. And, all of my ingredients were purchased on sale, which is always a plus. The ham, for example, was on sale for $5 a pound at the deli department, where I was able to request a thicker cut than standard deli meat. I should specify that this recipe doesn't need to be made with the heels of bread, but rather can be. But, I mean, you have 2 heels that you're going to throw away anyway, why not use them?


Ingredients:
1 egg
A splash of milk (1/8 of a cup to 1/4 cup)
2 heels of bread (I used sourdough bread)
1 slice of thick cut ham (or a serving of thin sliced ham)
1 1/2 pieces of Colby Jack cheese
1 Tablespoon of butter

Recipe:
Prepare sandwich with 2 heels of bread, a slice and a half of cheese, and ham.
Whisk together the egg and milk in a bowl wide enough for a piece of bread.
Warm a frying pan over medium heat with 1 Tablespoon of butter.
As the frying pan heats, dip the sandwich in the egg-milk mix. Then flip it over and dip the other side, much like with french toast.
Next, grill the sandwich, much like a grilled cheese sandwich. The sandwich is ready when both sides of the bread are slightly crispy, and the cheese has melted. Remove from the heat and cut in half.
With the left over egg-milk mixture, you might combine with salt, pepper, or other seasoning and make milky scrambled eggs as a side dish. 


This sandwich is delicious and uses a lot of ingredients that you already have in your in your kitchen. I think this will be my new way of using up the heels of bread. Try it. It just might be yours too!

Thursday, January 16, 2014

Seafood Alfredo

I found a GREAT deal the other day: a mix of fresh seafood for only $1.50! The mix contained squid, cuttlefish tentacle, shrimped, mussels, and, unfortunately, imitation crab. I eventually just took out the imitation crab. I had no idea it was possible to get so much seafood for so cheap. It was enough for about 3 or 4 servings. I would highly recommend purchasing a seafood mix like this, but making sure it has very little imitation crab (so that you can throw it away without guilt).

Ingredients:
1 Mix of Seafood (I picked mine up at the Safeway meat and seafood department)
1 jar of Alfredo sauce
About 1/3 of a box of noodles (I prefer shell noodles with this sort of dish)
1-2 Tablespoons of butter

Recipe:
First, cook your seafood in a frying pan with butter, over a medium low heat. Look at how tasty it is.


As you heat your seafood, boil the water for your pasta. If all is timed well, the you should be adding your noodles to the water at the same time as you begin mixing together your sauce.
Once the seafood is cooked, strain the butter and combine with a jar of Alfredo sauce. Then heat over a medium heat, stirring often. You may add garlic salt, Italian seasoning, or any other flavor you might desire.
When the noodles are tender, strain them. Then serve and enjoy.


This was a delicious way to begin the semester. I made this once, then took the leftovers and stretched it out over a couple of very busy days. It could be better improved by adding a second jar of sauce (I prefer to combine 1 jar of light Alfredo sauce with 1 jar of regular Alfredo). There was definitely enough seafood to double the sauce.
I am very much looking forward to another great semester full of terrific food and fantastic courses. Of course, I'm sure in a couple weeks when I'm taking exams and writing papers, I'll have a completely different opinion of this semester. Until then, though, I am thrilled to be back.

Sunday, December 1, 2013

And the Winning Pie is...

BOTH OF THEM!

It was requested that I just go ahead and make both pies for Thanksgiving. And, although it required carrying about 10 pounds of pie in one arm, and a suitcase in the other, 1 mile to the bus, on the bus, and on the train all the way home, I think it was worth it. Everybody loved these pies.

Here are some pictures of the pies. I made them according to the recipes I previously posted (Blackberry Apple Pie and Caramel Apple Pie). Following the recipe I posted earlier (which includes more flower than I originally used), the slices of pie came out cleanly and the filling wasn't like soup. These two recipes are definitely ones to follow in the future.

 Berry Apple Pie

The berry apple pie featured the same pie crust as I used with my Triple Berry Pie. The design, however, was slightly different. This design featured an autumn tree with autumn leaf designs on the tree and on the edge of the crust. I used these cookie cutters for both of these pies.


Caramel Apple Pie

Using the same pie crust recipe, I created a latticed top on this pie. I used leaf shaped dough on the lattice, and created a pattern using apple shapes and acorn shapes on the edge of the pie.


It was a fabulous Thanksgiving. These pies were a delicious ending to an incredible feast. Everyone won with these pies.

Monday, November 18, 2013

Spinach Au Gratin


You probably already know that spinach is good for you. And I'm probably the only person in the world who actually likes it. But even if you don't, or especially if you don't, this spinach au gratin recipe is perfect for you. What's better than covering a vegetable with cheese? Making it low-fat and guilt free, that's what.
This recipe is adapted from Skinny Taste, which was a makeover recipe from Barefoot Contessa. Both recipes say it's the perfect recipe for the holidays. And I believe them. However, it's also good to make as a mini-meal or side dish. In fact, I reheated a large helping of it for dinner last night and was fully satisfied. It also went great with sweet apple chicken sausage. Make it on Sunday and reheat it for the next week and you'll be a well fed college student.


Ingredients:
4 Tablespoons of light butter
1 cup of finely chopped onion (about half an onion)
1/4 cup of flour
1/3 teaspoon of nutmeg
3 cups of fat free or low fat milk
3 pounds (3 16-oz packages) of chopped spinach, defrosted.
3/4 cup of grated Parmesan cheese
1 Tablespoon of salt
Black pepper (to taste, 1/2 teaspoon is recommended, but I didn't use any at all)
3/4 cup of shredded Swiss Gruyere cheese

Recipe:
First, drain the previously frozen but now defrosted spinach. To do this, put one bag at a time into a strainer and mash it with a potato masher, large slotted spoon, or a fork, to drain all the excess liquid. Move to a large bowl and then do the next bag. Alternatively, the comment section on the Skinny Taste post had the suggestion of using a potato ricer. Do whatever you have to do to drain as much liquid as you can from the spinach.
Next, melt the butter in a large saute pan. Saute the onions over a medium heat for about 10 minutes, until the onions are translucent.
Then, add the flour and the nutmeg. Cook for about 2 more minutes while stirring occasionally.
After 2 minutes, add the milk. Cook for about 5 more minutes, while the mixture thickens.
At this point you should begin to preheat the oven to 425 degrees.
Then, slowly stir the spinach into the mixture. Add in 1/2 a cup of Parmesan cheese and 1/4 cup of Swiss Gruyere cheese..
Next, spoon this into a large casserole dish. Spread it evenly, then cover with the remaining 1/4 cup of Parmesan and 1/2 cup of Swiss Gruyere cheeses.
Then, place on the center rack of your oven and bake for about 20 minutes, until the cheese has melted and it becomes hot and bubbly. You'll be able to tell when it's ready, don't worry.
Allow to cool slightly before serving. And enjoy. My goodness you should enjoy this recipe because it is delicious.

I'm still trying to decide if it's worth trying to make this on Thanksgiving. It is not the kind of dish that can be prepared ahead of time and I don't want to crowd an already crowded kitchen. However, I do highly suggest this recipe and I recommend trying it if you have the time and the kitchen ability.
This is definitely not a dorm-friendly recipe. But it is good for any student living off-campus or anyone trying to prepare something when they are home for the holidays.

Sunday, November 17, 2013

Grown Up Mac and Dogs

Ok, so you already know how much I love sweet apple chicken sausage. But, you should know that my absolute favorite food in the whole wide world is four cheese corkscrew pasta, you know like the kind that comes from a box? I guess I have a pretty simple palate. When I was little, my mom used to make Mac and Dogs, using four cheese corkscrew pasta, sliced up hot dogs, about 1/2 a Tablespoon of Dijon mustard. As a kid, I would have eaten the whole pot if my mom didn't stop me.
Now that I'm all grown up, the only thing that stops me from eating a whole pot is the fact that I would like to fit all of my jeans tomorrow, please. Well, that and the fact that until recently I could no find any Pasta-Roni four cheese corkscrew pasta. Which is horribly depressing because it's my favorite food in the whole wide world. The other day, just by happy coincidence, I was shopping at a different grocery store. And while I was in the mac and cheese aisle, I happened upon a small collection of that beautiful blue box. It wasn't with the Rice-A-Roni, or with pasta, but with the mac and cheese, right under a box of Velveeta mac and cheese.
So, of course, I bought a box, even though it wasn't on sale or anything. And right away I decided to make some for dinner. But, when I got home I realized I didn't have any hot dogs. Woah is me, right? So, I decided to try it with sweet apple chicken sausage instead. And I must say, it tasted better this way.


Ingredients:
1 box of four cheese corkscrew noodles (I used Pasta-Roni)
1 1/2 cups water
3/4 cups of milk
2 Tablespoons of butter
1 sweet apple chicken sausage, sliced
1/2 Tablespoon of Dijon mustard * (Optional)

Recipe:
First, bring the water, milk, and butter to a boil. Yes, it does actually have to be 1 1/2 cups of water. Be precise.
As it comes to a boil, heat and prepare chicken sausage. I used a pre-cooked sausage this time, which meant it just had to be microwaved for a minute.
Once it is boiling, slowly add the noodles and special seasoning. Return this to a boil.
Reduce heat to a medium heat and boil, uncovered, for about 7 minutes, stirring frequently.
After 7 minutes, stir in the slices of chicken sausage. If desired, add in the mustard at this point as well. Let sit for about 5 minutes while the sauce thickens. Be patient with this because it makes all the difference.

If I was on death row and had one last meal before I died, I would probably request this. And steak. And lobster. And cake. And cookies. And cookie dough ice cream. And whipped cream. And an entire container of sprinkles. I would cause a lot of trouble if I was on death row.
Anyway, I highly recommend that you try this recipe. It's simple, but it's delicious. Sometimes simple is good.

Monday, November 11, 2013

Battle of the Pies

So, as you probably have read, I have been making pies in preparation for Thanksgiving. And I can't decide which one to make. I narrowed it down to two: Caramel Apple Pie and Blackberry Apple Pie. But now I need your help. Which of these wonderful pies should I make? Fill out the survey here to give your opinion, and voice any questions or comments in the comment section below (or on the posts for either of the pies).
And now, some information about our contenders.


Contender Number 1 is quite rich. He blends well with the other rich fall flavors to be expected at Thanksgiving, including pumpkin and pecan pies. If you weren't full before dessert, you will be after eating this pie. Completed with caramel drizzle, this pie is sure to be enjoyed until your gut explodes, which is both good and bad. Contender Number 1 is certainly a heavy weight Thanksgiving Pie, both in richness of flavor and caloric weight.

Contender Number 2 is a humble fellow. He isn't rich, which makes him unique on the Thanksgiving desert table. What he lacks in richness, Contender number 2 makes up for with a certain tart sweetness. Unlike Contender Number 1, Contender Number 2 is patient and is therefore willing to wait until a more appropriate season before being devoured.


So, who will win in this ultimate battle of the pies? Only time and a survey will tell.

Blackberry Apple Pie


In quite the contest against this pie, I decided to try one other pie recipe.This recipe is for blackberry apple pie, thanks to the wonderful Martha Stuart (who, as I've mentioned previously is one of my idols). The original recipe can be found here, though I made a few adaptations.

Ingredients:
1/4 cup sugar
1/4 cup flour
1/2 teaspoon ground cinnamon
1/4 teaspoon salt
5 1/2 cups of assorted apples, peeled and thinly sliced (again, try crisp and tart apples such as Granny Smith, Gala, Honeycrisp, and Jonagold)
10 ounces (2 1/4 cups) of fresh or frozen blackberries, thawed

Recipe:
First, wash, peel, and slice (in that order) your apples. I strongly recommend using Granny Smith and at least one other type of apple. To slice, I took an apple cutter like this to slice the peeled apples. Then, I sliced each of these pieces in half, thirds, or quarters, depending on the size of the slice. 
Next, whisk together the sugar, flour, cinnamon, and salt in a large bowl.
Then, add the apples and mostly drained blackberries and toss to coat (I forgot to drain my blackberries and ended up with a very runny pie).
Preheat the oven to 375 degrees.
While the oven preheats, spoon the filling into a prepared pie crust. Be sure with this pie that you either cover the top with more crust (latticed, designed, or completely covered with some holes) or cover in tin foil for the first 40 minutes of baking.
Bake for 50 to 60 minutes (removing tin foil after 40 minutes, if applicable).


This pie. Oh my this pie. If I don't make it again for Thanksgiving, I'll definitely be making it at some point again (maybe in the summer). It's definitely sweet, but more on the tart side of sweet. The blackberry and the apple compliment each other splendidly. I highly recommend that you try this recipe. But it is definitely more of a summer pie (perhaps late August/early September when blackberries are still in season at the grocery store).
Please, again, leave any questions or opinions in the comment section below. A survey post is soon to follow. I look forward to seeing your views on this ultimate of questions: WHICH PIE SHOULD I MAKE?!

Caramel Apple Pie


After making my first pie a little while ago and being rather successful at it, my mother requested that I make another pie for Thanksgiving this year. I filled up my pinterest boards with way too many pie recipes. Then, I narrowed it down to two: caramel apple pie or blackberry apple pie. I'm going to need your help deciding which one to make, so look for the upcoming post where I will include a survey. But that's all later. For now, here is the caramel apple pie (recipe adapted from Pillsbury):

Ingredients:
Pie crust (frozen, homemade, or refrigerated)
1 cup sugar
1/3 cup flour
1 teaspoon ground cinnamon
5 cups of peeled and thinly sliced apples (use a variety of tart and crispy apples, I used Granny Smith, Gala, and Honeycrisp)
1/2 cup caramel apple dip (I used Light dip because that's all I could find)
5 Tablespoons milk
(Optional)
1 cup flour
1/2 cup brown sugar
1/4 cup softened butter

Recipe:
First, wash, peel, and slice (in that order) your apples. I strongly recommend using Granny Smith and at least one other type of apple. To slice, I took an apple cutter like this to slice the peeled apples. Then, I sliced each of these pieces in half, thirds, or quarters, depending on the size of the slice.
In a large bowl, mix sugar, 1/3 cup of flour, and cinnamon in a large bowl. Add the apples and toss to coat.. Spoon this pie filling into the crust.
In a small bowl, mix about 3 Tablespoons of caramel apple dip with about 3 Tablespoons of milk. Mix thoroughly, adding more caramel to make thicker, or more milk to make thinner. Drizzle this over the pie.
Preheat the oven to 375 degrees.
While the oven preheats, mix 1 cup of flour, the brown sugar, and the butter in a medium sized bowl to create a crumb topping. Sprinkle this topping over your pie filling. This is an optional step, but you should either use this or have a top to your pie (be it a latticed top or a solid top with holes punched in it, or what have you).
Next, bake for about 50 to 60 minutes, or until the pie is golden brown. Allow the pie to cool for 10 minutes.
After the pie has cooled, take your remaining caramel apple dip and add more caramel and/or milk 1 Tablespoon at a time, until it is a sufficient amount. Then, drizzle the caramel over the cooled pie.
It is recommended that you allow the pie to cool for at least 2 hours before serving.


This is a very good autumn pie. The caramel was sweet without being too sweet, and the apple was tart without being too tart. It was also extremely rich tasting, which is both good and bad.
So, here is pie number one. Pie number two is soon to follow. Please leave any questions or opinions in the comment section below.

Wednesday, October 30, 2013

Halloween Cake


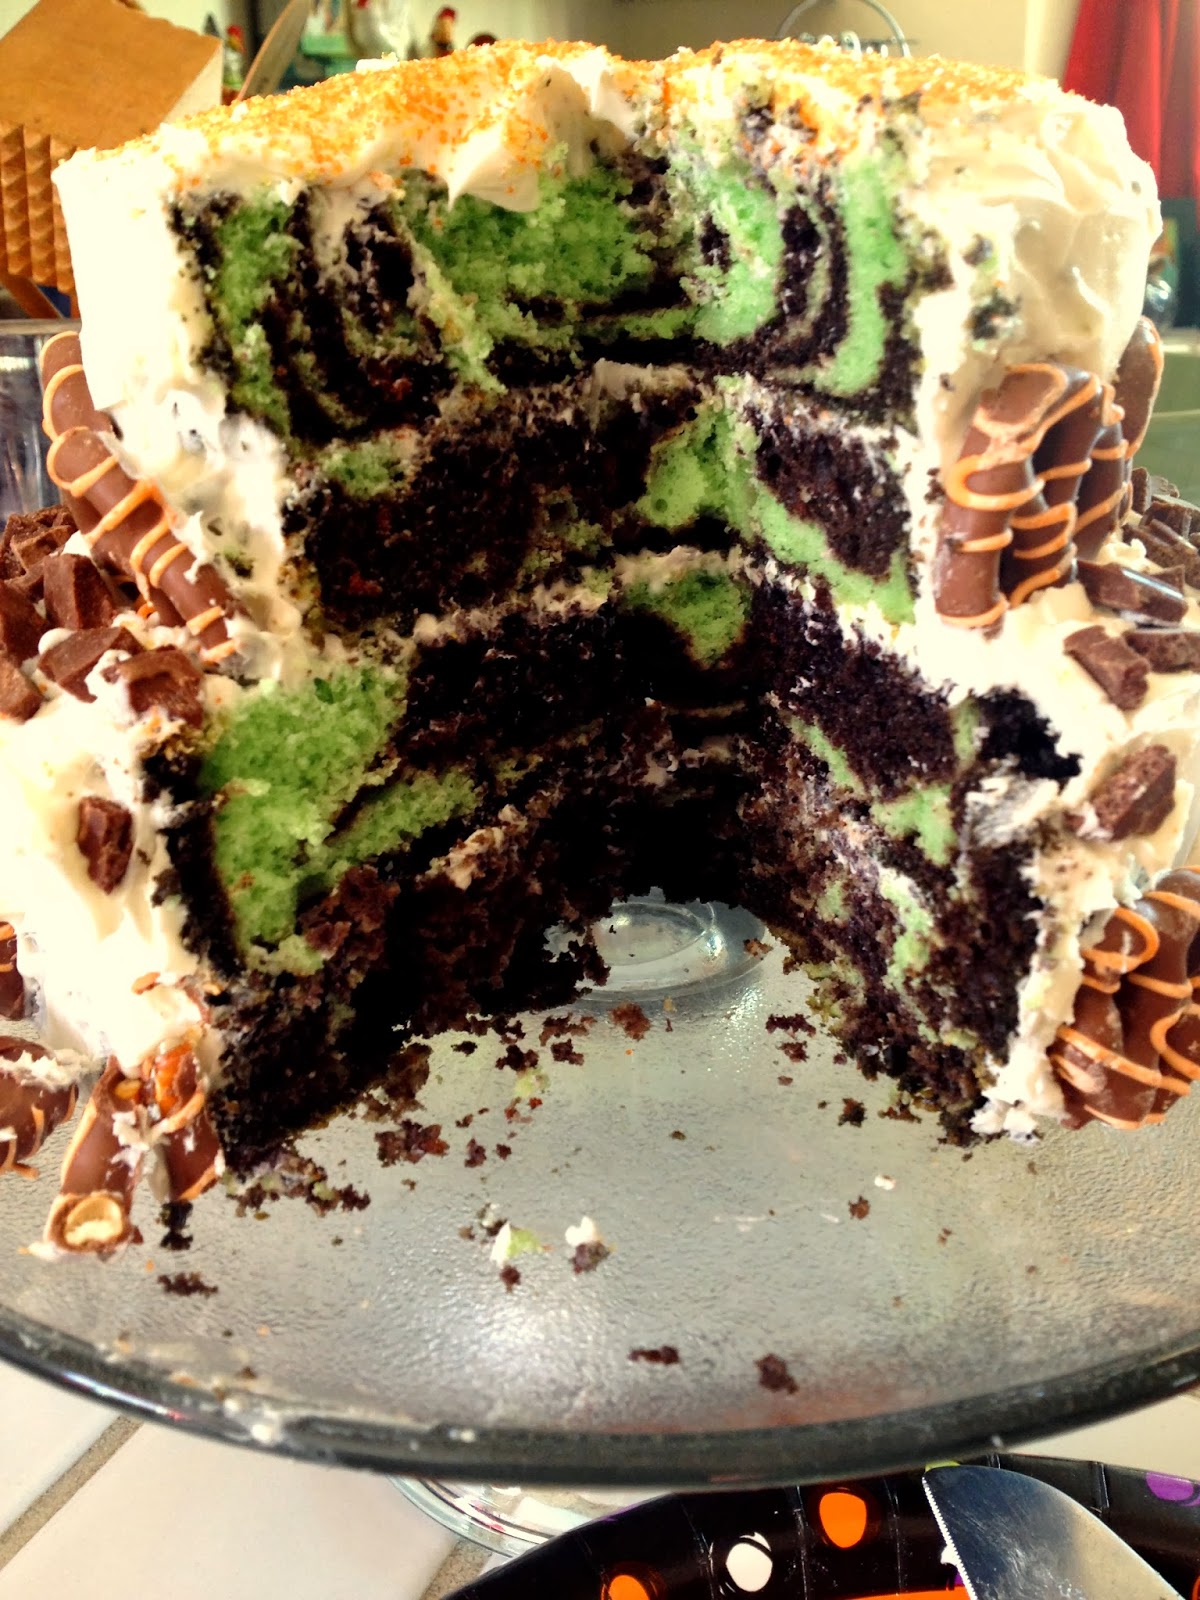
My mother's birthday is Halloween. You may remember that from the last time I made a cake for her birthday. Last time I tried my hand at latticed frosting, but this time my experimentation wasn't immediately obvious. The cake sat out on the counter looking pretty for most of our family gathering. My grandmother even commented on the cake to my mother, thinking it had been purchased from a bakery. Now, that makes me feel just a little bit of pride. Especially since, really, it looked like a simple tiered cake, with white frosting, orange sprinkles on top, store bought chocolate covered pretzels on the side, and chunks of broken Hershey's bars on the bottom tier.
The surprise came later, when we finally cut the cake. I had been waiting eagerly while my aunts and grandparents and siblings and assorted guests discussed, well, just about everything. Come on, get to the cake, I kept thinking impatiently. But finally, it was time. 
Are you ready for the surprise about this cake? Well, find your seats everybody. It's time for the grande finalle:


Bet you didn't see that one coming, did you?
For this cake, I decided to try my hand at making a zebra cake. I tried teaching myself, which went ok. I made a purple zebra cake for a second time the next week for a friend's birthday adapting the directions from King Arthur Flour and it went much better. The key is to make one of the two batters thinner than the other, so that it will spread when given the weight of the thicker cake batter. If made properly and with white cake instead of green cake (thank you food dye), it will look more like an actual zebra, which is great for kid's birthdays. Anyway, let's cut to the chase. Here's the proper way to make a zebra cake.

Ingredients:
2 cake mixes (1 chocolate and 1 white)
7 eggs (yes, you read that right, 7 eggs)
Black food dye (optional but recommended)
2 2/3 cups milk
1 cup vegetable oil (or for a richer cake, use melted butter)

Recipe:
In one medium-large bowl, mix together white cake mix, 3 egg whites (do not include the yokes!), 1 1/3 cup of milk, and 1/2 of vegetable oil or butter. Mix well using a mixer.
In another medium-large bowl, mix together chocolate cake mix, 4 whole eggs, 1 1/3 cup of milk, 1/2 of vegetable oil or butter, and several drops of black food dye.
In a greased, round cake pan place 2 large spoonfuls of the thinner white cake mix, directly to the center of the pan.
Then, on top of that, place 2 large spoonfuls of the thicker chocolate cake mix, directly in the center of the white cake mix, so that it looks like a bulls eye.
Place 2 large spoonfuls of white cake mix in the center on top of that, then 2 large spoonfuls of chocolate in the center on top of that, and so on and so forth. Watch as the thinner batter continues to spread under the weight of the thicker chocolate batter. Be warned, this is enough cake batter to make a 4 layered cake. If desired, you may make a two layer cake and use the left over batter to make both vanilla and chocolate cupcakes. Or, do what I did and make a tiered 4 layer cake, using 2 round cake pans of different sizes, then just eat the cake batter that's left over. Yummy.
Bake according to the directions on the box (typically 350 degrees for anywhere between 28 and 28 minutes depending on the size of the cake pan). The cake is ready when a toothpick can be inserted into the center of the cake and removed cleanly or with crumbs. Then remove from the oven and allow to cool.
After cooling, frost and layer the cake according to whatever grand master plan you have created. Then decorate as desired.


This cake was deliciously moist and looked SO COOL! I highly recommending making a cake like this. It's so much more fun than a marbled cake. It looks incredibly impressive. And it's super easy! Seriously, making this kind of cake will change your life. You'll never want bake a cake any other way again!


Monday, September 30, 2013

Banana Chocolate Chip Muffins

I was in a baking mood the other day. Ok, I'm always in a baking mood. I also had some very ripe bananas sitting out, waiting to be used for something. I could have made my Vegan Banana Bread recipe, but that just didn't seem quite enough. I needed chocolate. So, I wandered around the baking aisle of the grocery store until I found something to make the perfect dorm/college friendly recipe. Martha White makes chocolate chip muffin mix in small enough to make only 6 muffins at a time. Of course, this recipe makes 12 because I added to it. Even so, that's a small amount of muffins when you're only cooking for yourself.


Ingredients:
Martha White - Chocolate chip muffin mix
2 ripe bananas
1/2 cup 1% milk

Recipe:
First, peel and mash the bananas in a medium sized mixing bowl. This part is really fun and a great way to relieve stress. Mash the heck out of them using whatever tools you have (a fork, a spatula, a slotted spoon, whatever).
Next, preheat the oven according to the packaging, most likely around 425 degrees.
While the oven preheats, mix the bananas with the muffin mix and milk.
Place 12 muffin tins (pre-made or dorm-made like this) in a muffin pan. Scoop approximately 2 Tablespoons of batter into each tin.
Bake for approximately 12-14 minutes, or until a toothpick inserted into the muffin comes out clean or with crumbs. Then, remove from the oven and allow to cool before serving.


This recipe is great for college baking. It makes only 12 muffins, so you are able to share with a few friends and keep a few for yourself, without wasting any by allowing them to go stale. They're also great because they're relatively healthy compared to other muffins. Muffins made with recipe contain only 97 calories each (compared to 160 calories). Plus, they contain calcium, vitamin B, and vitamin B12 from the milk and mix and potassium and fiber from the bananas. And, as an added bonus, they actually taste good! Enjoy for breakfast with a side of fruit and a glass of milk to start your day right, as a healthy snack between classes, or as a post-exam treat.

Wednesday, September 25, 2013

The Perfect Fall Dinner

After a very, very long and unusually warm summer, fall has finally arrived. And with it has come the rain. Soon, there will be mushy leaf puddles to stomp in as I venture from between home, classes, and teaching. I'm about to begin working my first real job as an after school program assistant, in addition to nannying, and working with 3rd graders, and choir, and orchestra, and harp lessons, oh and regular school. And though I am nervous about the busy schedule I know awaits me as soon as October begins, I am thrilled for fall to begin. I cannot wait to bike home after school and orchestra on crisp autumn nights, or to drink cider while watching scary movies. Yes, I think fall will be okay.

Yesterday, as it rained outside, I came to the sudden realization that fall was, indeed, here. The forecast no longer predicts any 80 degree days, and the probability of precipitation is nearing 100% each day. I already had Al Fresco sweet apple chicken sausage, which I picked up 5 for $3.99 at Fred Meyer a while ago and had defrosting in the fridge.

Sausage

The sausage I bought was raw, which made for a bit of a challenge just because I was so worried about undercooking it and then making myself ill. But, I've done it twice and have lived to tell the tale!
It's actually pretty simple. I just fried them in a frying pan for about 20 to 25 minutes. The package said to turn it occaisionally, but I actually turned the sausage about once every minute because I was afraid of cooking it unevenly. I might have been a bit too worried about it, though. Anyway, it turned out ok. I liked it, at least. And really, apple sausage is the most underrated form of sausage. It's so good. Great for summer because it's sweet, but even better for fall because of the apple.


But what goes with apple sausage in the fall?

I went to the grocery store to figure this out (before I started cooking dinner, of course). That's when I noticed microwavable sweet potatoes in the veggie section. I LOVE sweet potatoes. They are my favorite thing at Thanksgiving dinner, but why wait until then?

Sweet Potato

The best part about these sweet potatoes, though, were the fact that they are so easy. They're wrapped in special plastic, so just pop them in the microwave for 5 to 8 minutes (until tender, as desired) and WAM! You've got yourself a steamed sweet potato. No work, no mess, no fuss. How dorm friendly is that?
You can enjoy your sweet potato plain, or add brown sugar, cinnamon, cloves, ginger, and/or whipped cream, as desired. I chose to add about half a Tablespoon of brown sugar (because you doesn't love brown sugar and sweet potatoes?) and such a small hint of Allspice that you almost didn't know it was there. And, of course, whipped cream because we already had some in the fridge so why not?


Green Beans

I decided that since I was kind of cheating with my sweet potatoes, I would learn at least one new cooking method. Afterall, I'm in school, I'm supposed to learn things, right?
So, I learned how to cook fresh green beans. Not the kind in the can (though, I remembered once I got home that I had some of those already). The actual kind. Good old Wikihow taught me how to make these. Here's my preferred method:

Ingredients:
Fresh green beans
Water in a medium sized pot
Salt (you can use pepper if you desire, too, but I hate pepper so I didn't)

Recipe:
Fill a medium sized pot with just enough water to cover all of your green beans. Boil the water, don't add in the green beans yet.
Clean the green beans. Then, snap them and pull off the stringy stem. Or, alternatively, just cut the ends, to speed up the process. You can cut one or both ends, but make sure there's no stem attached, that's the important part.
Once the water is boiling, add your green beans. Wait until the water returns to a boil, then reduce the heat to a low heat and let them simmer for about 4 minutes. I did 5 because I was distracted. Just make sure they are as tender as you'd like.
Then, drain your green beans. Return them to the pot and season as desired, with salt and/or pepper.


In the end this was really a fantastic dinner. It reminded me of some my favorite parts of Thanksgiving dinner, without all that yucky turkey. Of course, it was missing my Grandma's homemade rolls, but, it was as close as I could get. And, really, for a quick and easy dinner, I was pretty glad.

Monday, September 16, 2013

Triple Berry Pie

Years ago, Martha Stuart was asked in an interview if she had ever used a frozen pie shell. Deeply offended, she denied it, saying it was too quick and easy to make a pie crust from scratch. My mother, upon hearing this, laughed at Martha.
For years, I thought my mom, who could make the perfect blackberry pie filling with her eyes closed, was just being lazy, or was using the wrong recipe, or was impatient, or something. I mean, there's no way Martha Stuart would lie, right?
Well, of course, we all know Martha Stuart is capable of telling a lie or two here and there.

Anyhow, my mom wanted a pie and I decided to take her on, proving once and for all how simple it must be to make a pie entirely from scratch. I poured through recipe after recipe, trying to find one that I could make with the ingredients already in our kitchen. I ended up finding a berry pie recipe from Instructables. Though I didn't end up using the recipe for the berry filling, I found the dough recipe and instructions to be incredibly helpful.


I'm not going to share the recipe with you, though. If you visit the website, you'll see what I mean. There is no way to make that dorm (or college student) friendly. Absolutely no way. It takes way too much time (read: energy) and ingredients (read: money) for a college student to be making this. If you really want to make a berry pie, just be like my mother and use a frozen pie shell. Nobody's going to judge you. You're a college student, after all. Plus, this berry filling recipe is so good, nobody will notice your pie shell.
But I digress. Here is a slightly altered, dorm/college student friendly version of this pie

Ingredients:
1 package of frozen pie shell (contains two shells). Don't cheap out on this part.
4 cups of fresh and juicy berries (I used 2 cups blueberries, 1 cup blackberries, 1 cup raspberries). But, really, any combination of any berries would work. Avoid strawberries if possible, though, as they are more acidic and may alter the chemistry in the filling)
2/3 cup of sugar
1/3 cup flour
1 Tablespoon of lemon juice (from the bottle works great, or if you just want to squeeze half a lemon over the bowl, that will work too).
1 egg white mixed with 1 Tablespoon of milk OR 1-2 Tablespoons of butter (optional)

Recipe:
Remove pie shells from freezer.
Prepare berries by picking, hulling, and washing them. Be sure to dry them, as well. This is where a salad spinner comes in handy. But shaking a small amount in a pasta strainer will work well enough for our purposes.
In a large mixing bowl, toss together berries until they are mixed (if using multiple types of berries)
Next, slowly add sugar, flour, and lemon juice. Stir together with a wooden or plastic spoon (anything but metal, if at all possible). The sugary mixture should create a sort of paste that will thicken the berry filling. Be careful when stirring the filling, so as to avoid breaking the berries. It's ok if a few break, as they are fragile it's difficult to avoid, but be cautious not to overwork them.
Let stand for 10 to 15 minutes. Meanwhile, preheat the oven to 375 degrees F.
If desired, use a pastry brush to brush whisked egg yoke and milk mixture onto the bottom of 1 pie shell, or, alternatively, dot melted butter along the bottom of the shell. This will prevent it from getting soggy and messy once the filling has been added.
Next, spoon the filling into that pie shell. Use a spoon or a spatula to make the surface roughly even.
Then, take the other pie shell and place it on top of the 1st pie shell (the top one should be removed from the tin pan that comes with it in the package. If the shell breaks, use the pieces to create a design along the top in whatever artistic fashion you desire. You may always use a knife or a cookie cutter to create shapes to be on the top of your pie.
Now, place the pie in the oven. Bake for approximately 40 minutes to an hour (this all depends on your pie shell and your oven. When in doubt, follow the instructions on the pie shell, since that is the more likely to burn or become overdone than the filling itself. Remove when the pie shell has become golden brown.


Serve this pie while it's still warm, though it will taste good cold as well. Create Pie A La Mode by adding a scoop of vanilla ice cream on top. French vanilla ice cream pairs well with any pie that contains blackberries.

My mom was out of the house when I made this pie. And, of course, when she returned home she had in her hand a strawberry rhubarb pie. However, we did the taste comparison. And mine was better, hands down. Plus, mine was prettier. I mean, look at this thing! This is what all food should look like.




A Summer to Remember

This summer was incredible. There's really no other way to describe it. I visited 8 different countries in 6 weeks. But I'll make it brief. Here's the list of places we visited (in chronological order):
Newport, OR, USA
Portland, OR, USA
Denver, CO, USA
Reykjavik, Iceland
London, England
Lille, France
Bruge, Belgium
Lille, France (again)
Tournai, Belgium
Brussels, Belgium
Rumes, Belgium
Lille, France (once more)
Avignon, France
Montpelier, France
Avignon, France (again)
Port Bou, Spain
Barcelona, Spain
San Sebastian, Spain
Hendaye, France
San Sebastian, Spain (again)
Saint-Jean-de-Luz, France
San Sebastian, Spain (even more)
Hendaye, France (again)
Paris, France
Frankfurt, Germany
Tacoma, WA, USA
Seattle, WA, USA
Victoria, BC, Canada

So, basically, it was an exhausting summer, but oh so much fun. I will remember this summer for the rest of my life.

You haven't been to London until you've taken
a photo in a telephone booth. 

Eating a delicious meat and cheese stuffed waffle
in Brussels, Belgium. Nobody else enjoyed them.

Our lovely hosts in Lille, Cyrielle and Celine. 

Our beautiful host in San Sebastian, Irene.


The incredible beach in San Sebastian, Spain.
Can you imagine living here?


The Eiffel Tower and the Seine, in Paris, France

So, what does this have to do with food?
Well, other than the fact that this is my blog and I get to do whatever I want with it, there is an actual connection between this incredible trip and this awesome blog. You see, food is approached differently in different cultures. Everything tasted just slightly different in each location. And the types of food were different, too.
In London, for example, I enjoyed a British breakfast: toast, eggs, ham, sausage, beans, and stewed tomatoes (ok, I didn't eat the tomatoes, but I ate everything else). And on our first day in San Sebastian, our Spanish breakfasts included: churros, granola with chocolate pieces and unpasteurized milk, cookies, orange juice, and Nesquik. Meanwhile, in Paris, our French breakfast was a croissant and either a very small and very strong hot chocolate or an even smaller and stronger coffee with milk and sugar (not sugar cubes, but sugar rectangular prisms).
Other things were different, too. Meats were fresher, dinner flavors were savory instead of sweet, and desserts were made with actual sugar. Ice cream was fruit flavored, but didn't taste like sorbet. And sausages were actually flavorful.


I tried so many foods that inspired me to attempt to create, myself. And it's probably a good thing that I have an actual kitchen in an actual house this year.
Which reminds me! You may have noticed that the name of this blog has changed. As I am no longer in the dorms, my new blog title is "The College Food Blog". This means some of the recipes will be a bit more complicated than dorm food. However, I will be sure to clearly identify the differences and, whenever possible, post dorm-friendly alternatives for you to use yourself.